Creating a new LiveReport
PERMISSIONS Users with security levels that allow the creation of LiveReports. Any security level in Autotask can be configured with this permission. Refer to Configure access to LiveReports Designer.
NAVIGATION Left Navigation Menu > Admin > Admin Categories > Features & Settings > LiveReports > LiveReports Designer or Reports > LiveReports > LiveReports Designer
IMPORTANT Before you start creating reports, you need to understand the Autotask data model. Each LiveReport can only access data from one data category, so you must pick the right one to be able to place the right fields on your report. Refer to LiveReports concepts you need to understand.
NOTE All fields on LiveReports are truncated at 10,000 characters.
Types of reports
When creating a LiveReport, you can choose between the following types of reports:
- The Standard Report option allows for more advanced formatting options than are available in express reports. You set up your report through the New Report wizard and once you click the Finish button, the advanced editor page opens. Use this option for more complex reports or when you want to use more advanced formatting options.
- The Express Report option allows you to quickly create a finished report. The Layout tab provides a basic formatting toolbar in the Preview pane, including a Theme menu to apply preset theme styles to your report. An Options tab allows you to set output options. You can adjust the formatting in the Report Designer at a later time. To access more formatting options, you can convert an express report to a standard report. A standard report cannot be converted back to an express report.
How to...
BEFORE YOU BEGIN All new reports must be saved to a folder. Before you begin, make sure you have access to an existing folder to save your report to, or permission to create a folder. Refer to Can manage LiveReports folders.
To create a LiveReport, do the following:
- To open the page, use the path(s) in the Security and navigation section above..
- Click the Create a New Report icon and select Standard Report or Express Report.

- Step through the New Report Wizard page tabs described below to create your report. Use the Next and Previous buttons to navigate between tabs. You can also click a tab to go directly to it.
NOTE Some tabs contain fields that you must complete before you can continue to another tab. If you try to skip one of these tabs, a message will prompt you to go back and fill in the missing information.
- For Standard Reports, click Finish to open the Edit Report view where you can fine-tune your layout, run your report, and access a number of advanced features. Refer to Formatting and editing LiveReports.
- For Express reports, click the Save Report icon
 to save a report in progress. Click Save and Run Report
 to see the report, or click Save & Close.
Name Tab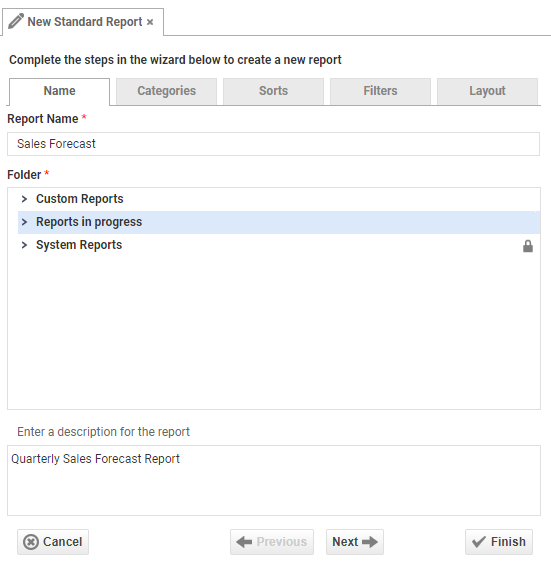 |
|
|---|---|
| Report Name | Enter a unique name for your new report, up to 255 characters. Avoid special characters such as ? / \ * " < > :. |
| Folder | Select a folder or subfolder to save your report. For more information on creating folders, refer to Can manage LiveReports folders. |
| Report Description | Enter a description of the new report. TIP The Search function on the main page of LiveReports Designer will search for matches in the description as well as the report name. Adding a description with a number of key terms will make it easier to find the report you are looking for. |
Categories Tab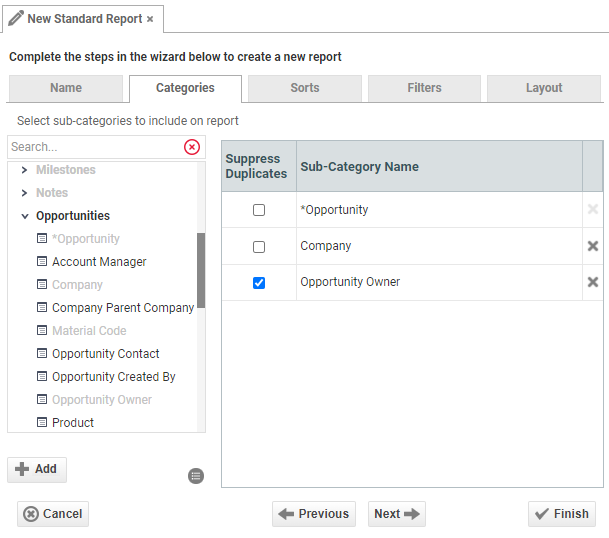 |
|
|---|---|
| "Select sub-categories to include on report" pane | Select the entities you will be reporting on, or use the Search field to search for a specific category. Your selection determines what the report will ultimately be about. For a description of Autotask data categories, refer to LiveReports concepts you need to understand. EXAMPLE In the screen shot above, Opportunities is an entity that contains Categories, such as Opportunity, which is also the base subcategory, identified by an asterisk. An example of a Data Field within Opportunity would be Expected Close Date. |
| ">" in front of category names | Click the > symbol to display the subcategories in each category. Each category contains multiple subcategories, and each subcategory contains data fields. The first subcategory listed within each category, identified by an asterisk* is called the base subcategory that contains the core data of the category. All other subcategories in the category are attributes of that core. TIP The data fields are placed on your report on the Layout tab. Make sure you add all categories that contain data fields you want to put on your report. |
| View Sub-Category Fields |
Select a subcategory and click the View Sub-Category Fields icon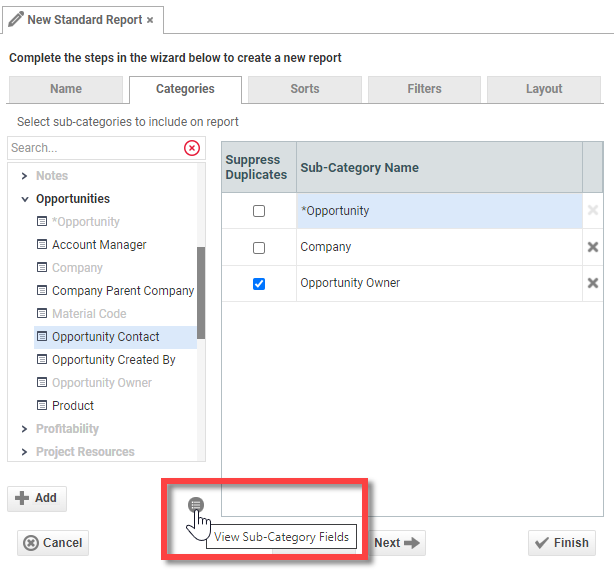 For a comprehensive list of all Data Fields available in LiveReports, refer to the Data Field Dictionary. |
| Select the category and then click Add, double-click, or drag and drop it into the right pane to add it to the report. When you start selecting categories, other categories will become unavailable (grayed out). This happens when there is no commonality or direct connection (no "join") between the subcategory that is already selected, and the grayed-out ones. | |
| Suppress Duplicates check box | If data columns contain values that are repeated over multiple rows, you have the option to suppress the duplicates. An example would be the organization name and account manager that are repeated for multiple billing items. If you select Suppress Duplicatesfor the Organization subcategory, the Organization Name and Account Manager are displayed on the row of the first billing item for each company and are suppressed on subsequent rows. NOTE When you suppress duplicates for a subcategory, you must also define a Sort for one or more fields from that subcategory. This is done on the Sort tab. NOTE When you suppress duplicates for a subcategory, duplicate values are suppressed for all fields from that subcategory. |
| Delete Category icon |
Click to remove a selected subcategory from the right pane. |
Sorts Tab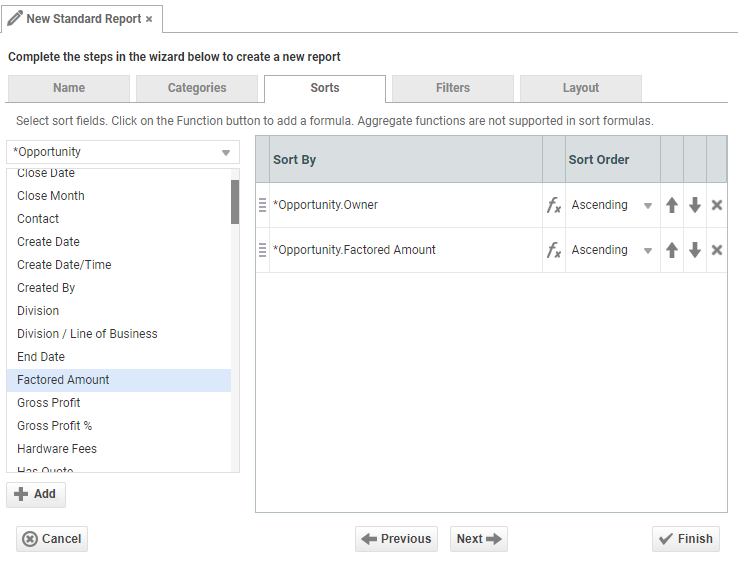 |
|
|---|---|
| Select sort fields dropdown | Lists the categories selected in the previous step. Select a category to display the data fields it contains in the pane below. You can sort on any field in any selected category. |
| Select a field and click Add, double-click, or drag and drop into the Sort By pane. | |
| Sort By | Displays the Category name followed by the Data Field name for the fields you selected to sort by, for example, Organization.Organization Name. |
| Edit formula for sort |
You can use a formula to define the sort in your report. Click the Function icon EXAMPLE Use a DateDiff formula to sort a ticket list by the length of time the ticket was open. |
| Sort Order | Select Ascending or Descending sort order for each field. The data field that appears first in the list is used as the first sort. Use the Up and Down arrows to change the order of fields in the list. TIP Any data field you wish to group by needs to be added as a sort option. For example, if you are running a monthly billing report and want it to be broken out by customer, Organization Name would be the report group header. For more information on adding Group Headers, refer to Working with Sections. |
| Delete icon |
Click the Delete icon |
On this tab, you create filter statements that filter the data at run time, based on user-entered alphanumeric or numeric values (or functions for date fields). You can define multiple filters.
NOTE Some filters are more efficient than others. For information on efficient and inefficient filters, refer to LiveReport Filter Optimization.
Filters Tab 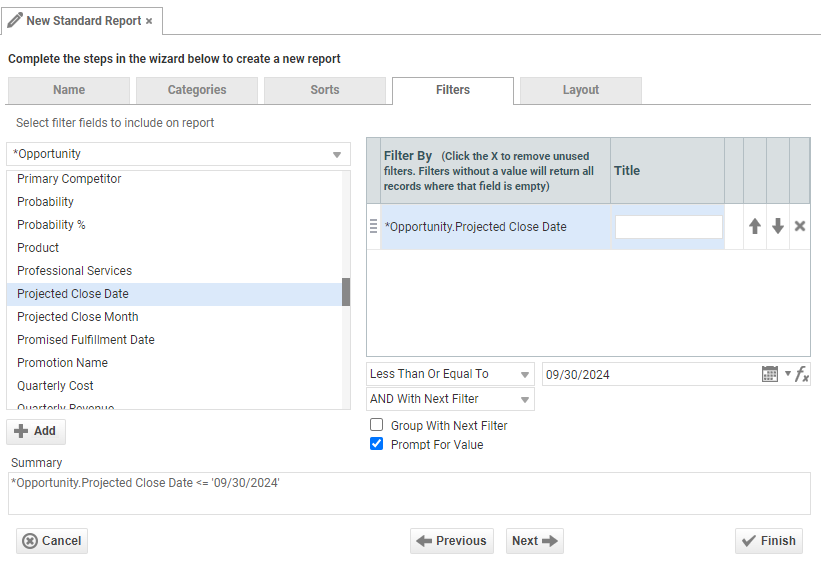 |
|
|---|---|
| "Select filter fields to include on report" dropdown | Click the dropdown and select the category that contains a data field you want to filter on. |
| Select a field and click Add, double-click, or drag and drop into the Filter By pane. | |
| Filter By | Displays the subcategory name followed by the data field name of the fields you selected to Filter By, for example, Opportunity.Projected Close Date. |
| Order | Use the Up and Down arrows to change the order of fields in the list. You can also move the fields up and down by grabbing the handle to the left of the field name. |
| Delete icon |
Click the Delete icon |
| Operator dropdown or Function icon |
The selection of the operator depends on the type of field that is being filtered. Date filters contain a calendar date selector, as well as a large number of dynamic date functions:
Boolean fields contain only two options:
Text and numeric fields contain the following operators:
|
| Value | Select a value from the drop-down menu or type part or all of the value into the field. Values may include numbers, dates, Autotask list values, etc. If you leave the filter value field blank, only records where this field is empty are returned. If you are filtering on a date field, you can use the calendar icon to search for the date or click the Function icon NOTE The drop-down box for your filter value will only display the first 100 items in order to optimize performance. You can refine the options in this drop-down by typing the first few characters of your desired value. |
| And/Or With Next Filter | And With Next Filter: Connect filters where both filtering conditions must be true to return results. This is the default. Or With Next Filter: Connect filters where either condition may be true to return results. |
| Group With Next Filter | Indicates the order in which the filters will be applied. Place all the filters that need to be grouped together one after the other, then add additional filters. The effect of using filter groupings is the same as using parentheses in an equation. EXAMPLE Molly and Sam both have customers in New York and Vermont. I apply the following filters: |
| Prompt For Value (not available when scheduling a report) | If Prompt for Value is checked, the filter criteria window will be displayed before the report is run and the user running the report can change or remove the filter or add a new one. The filter criteria change is for this run only. If the prompt check box is not selected, filters will be hidden when the report is run. If you hide the filters, make sure the Include Setup Info setting is selected in the report output options, so users will know what filters were applied. If you enter a value in the Title field above, that value will appear in the prompt instead of the field name. IMPORTANT Consider the security implications of allowing filters to be deleted or modified. Be selective about the filters you want to prompt for. Maybe you want to lock down the territory filter, but allow editing of a date range filter. TIP If you want to make sure that users who run the report have access to the Filters dialog, check Always Show Filters in Report Viewer to show the filter menu and allow changes to be made each time the report is run. |
| Summary | Displays the filter statement, which is the summary of all the filters that have been added. |
When you create an Express Report, the only way to format the report is on the Layout tab. When you create a Standard Report, you can use the layout tab to determine the order of the columns, but the basic formatting tools outlined below are not available. When you click Finish, Standard reports are immediately put into Edit mode, where they can be formatted. Refer to Formatting and editing LiveReports.
Layout Tab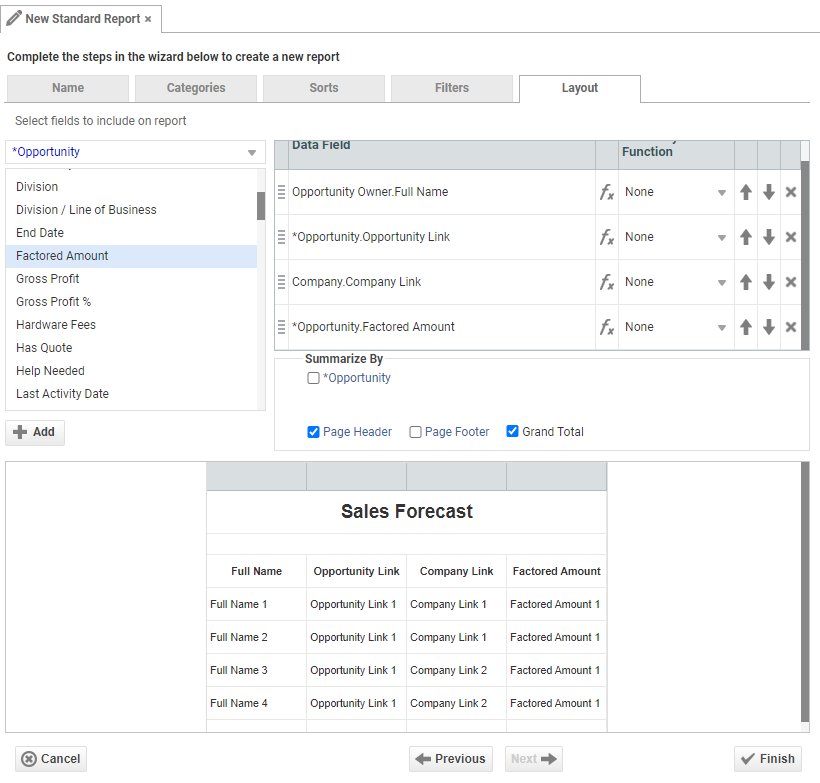 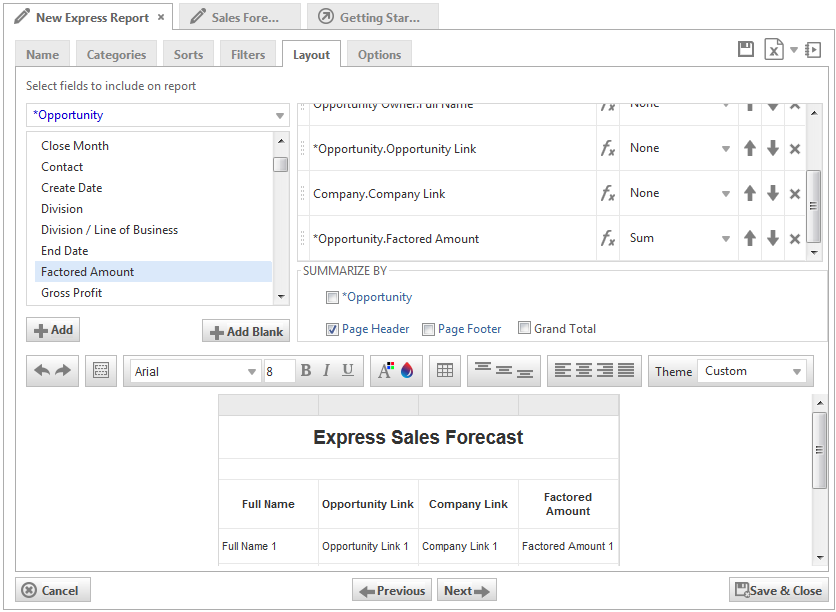 |
|
|---|---|
| "Select fields to include on report" dropdown | List of subcategories that you have added to your report. Select the subcategory that contains the data field you want to display in your report. For information on the categories that contain certain fields, refer to LiveReports Data Dictionary. |
| Select a field and click Add, double-click, or drag and drop into the Data Field list. | |
| Click Add Blank to add a blank column in the report. | |
| Data Field | Displays the subcategory name followed by the data field name of the fields selected to appear in your report. LiveReports creates one column heading per data field on the report. The data fields listed from top to bottom in this section will appear from left to right in the report. |
| Function button |
Click the Function icon EXAMPLE Use a String formula add text to a field value. |
| Summary Function | None: Displays data in the column with no further changes. This is the default. Sum: Adds the data in the column. Count: Counts the data in the column. Average: Takes an average of the data in the column. Minimum: Displays the lowest value of the column. Maximum: Displays the highest value of the column |
| Order | Use the Up and Down arrows to control the field order on the final report. You can also move the fields up and down by grabbing the handle to the left of the field name. The data fields listed from top to bottom in this section will appear from left to right in the report. |
| Delete icon |
Click the Delete icon |
| Summarize By |
To summarize numeric fields by any of the selected subcategories or display a Grand Total, select the appropriate check box. Click the subcategory name to set a field to summarize by, establish a header row, and include total values. Select Page Header or Page Number to include those in the report. |
| Report Preview |
Displays the report layout. For Express Reports, the preview pane includes a basic toolbar to format text and cells. For information on shared formatting tools, see Formatting and editing LiveReports. Express Reports have two additional features:
To expand the report preview, click the space above the formatting toolbar and below the Summarize By box and drag to resize the pane. |
NOTE The Options tab appears on Express Reports only.
| Options Tab (Express Reports Only) | |
|---|---|
| General | |
| Include Setup Info | Specifies whether the setup information is displayed when running the report. This includes the Data Categories included in the report and the sorts and filters. The setup information displays on a separate page. The setup menu options are: • No: Select this option if you do not want the setup information displayed on the report. This is the default. • Top: Select this option if you want the setup information to display at the top of the report. • Bottom: Select this option if you want the setup information to display at the bottom of the report. |
| Always Show Filters in Report Viewer | Check to always display the Filter window at runtime. For more information on filters, see the Filters tab tab of the LiveReports Designer. |
| No Data Qualify Display Mode | Decide if you want to show a message or display an empty report if no data is returned. |
| Export | |
| Allow Execution in Viewer | Select True if you want to allow the report to be executed in HTML format, where users can apply filters and sorts after the report has been run. |
| Allowed Export Types | Specify which export types are available. Unchecked formats are not available when running the report or exporting the report from the Report Viewer. |
| Default Export Type | Sets the default file type when you export the report. The following options are available: EXCEL (.xlsx) RTF CSV |
| Show Table | Option to display the table on the report. Selected as default. |
| Simulate PDF | Shows the exported report in the HTML viewer with the actual page width based on the page size selected from the Page Size dropdown. |
| Suppress Formatting | Prevents the report formatting (options selected from the toolbar, such as bold, wrap, etc.) from exporting to Excel. For more information on report formatting, see Formatting and editing LiveReports. The default is set to not suppressed. TIP Enabling Suppress Formatting greatly reduces the amount of time it takes for a report to generate. |
| Page Size | Sets the page size for the report. Page sizes include common North American and European page sizes. |
| Page Orientation | Sets the orientation for the report. Options include either Portrait or Landscape with the default of Portrait. |
| Fit to Page Width | Scales all columns to fit the width of the page. NOTE The width of each column depends on the dimensions and orientation of the page. Only applies for HTML if you checked Simulate PDF. |
| Advanced | |
| Convert Options | Click the Convert Express report to a standard report button to convert an Express Report to a Standard Report. This cannot be undone. |


