Configuring single sign-on with Datto SSO (Authweb)
PERMISSIONS Security level with permission to configure Resources/Users (HR). In the Partner Portal, Security Administrator permissions.
NAVIGATION Left Navigation Menu > Admin > Admin Categories > Organization Settings & Users > Resources/Users (HR) > Security > Single Sign-On (OpenID Connect (OIDC))
NOTE This topic provides vendor-specific instructions. For general instructions, refer to Configuring Single Sign-On (OpenID Connect).
Overview
Datto SSO (Authweb) has been enhanced to support the OIDC (OpenID Connect) protocol used by Autotask. Datto partners now have the option to use Authweb as their identity provider. You can log in once to use multiple Datto applications, including:
- Autotask
- Datto RMM
- Datto Workplace Manager and Datto File Protection Manager
- Datto Partner Portal
- Datto SaaS Protection
- Backupify/Datto SaaS Protection for G Suite and Office 365
NOTE Autotask will continue to support other identity providers using the OIDC protocol, and 2-factor authentication using an authentication code.
Configuration requirements
-
This feature must be enabled in your Partner Portal.
-
You must be a Security Administrator in the Partner Portal and an Administrator in Autotask.
Configuration steps
Configuring OIDC is a two-step process:
-
In step one, you configure OIDC SSO between the Datto Partner Portal and your Autotask instance.
-
In step two, you configure OIDC SSO between the Partner Portal and individual Autotask user accounts.
In this step, you configure SSO at the organization level. You will be copying information from Autotask to Authweb and Authweb to Autotask, so both applications must be open.
-
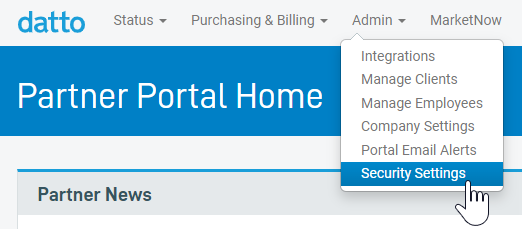
In the Partner Portal, navigate to Admin > Security Settings.

-
In the sidebar menu, click Autotask SSO, or scroll to the Autotask SSO tile.
-
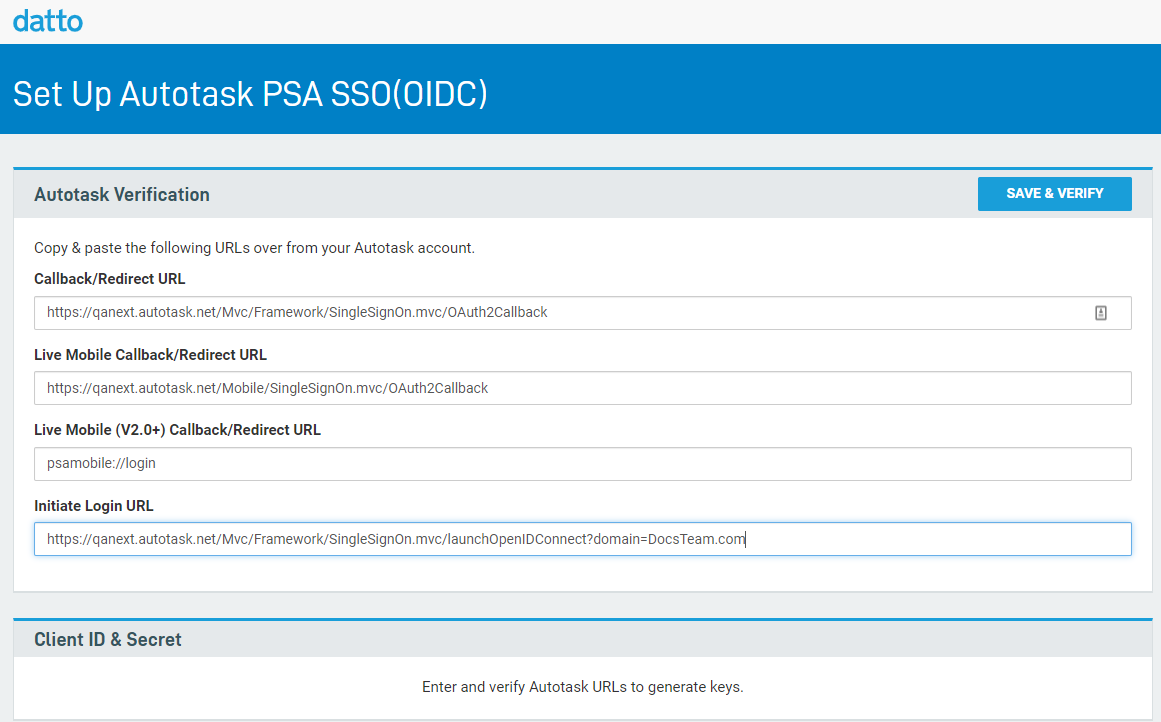
Click Set Up Autotask SSO). The OIDC configuration page will be launched.

-
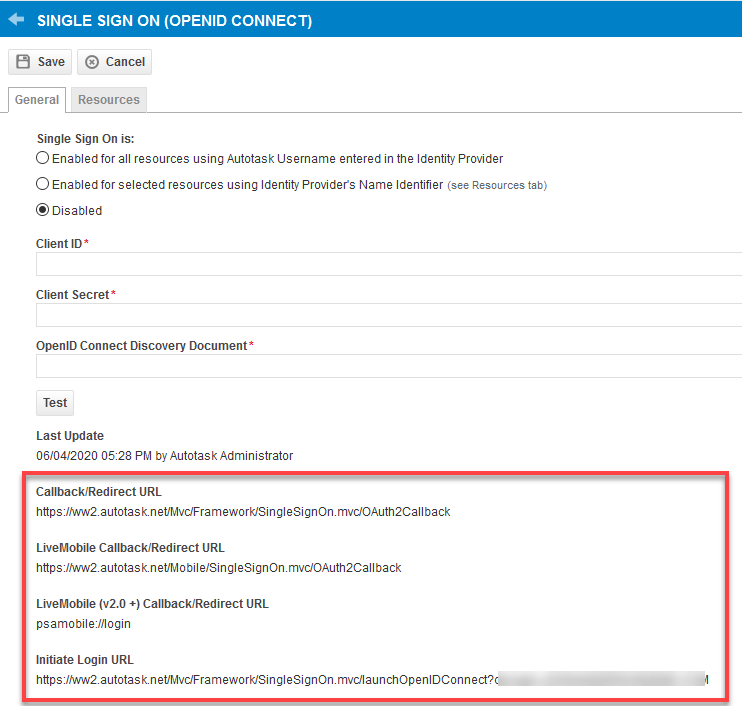
In Autotask, go to Left Navigation Menu > Admin > Admin Categories > Organization Settings & Users > Resources/Users (HR) > Resources/Users (HR) > Security > Single Sign-On (OpenID Connect (OIDC)).
-
Copy the following fields from Autotask and paste them into the Partner Portal's Autotask SSO configuration page:


- Callback/Redirect URL
- LiveMobile Callback/Redirect URL
- LiveMobile (v2.0 +) Callback/Redirect URL
- Initiate Login URL
-
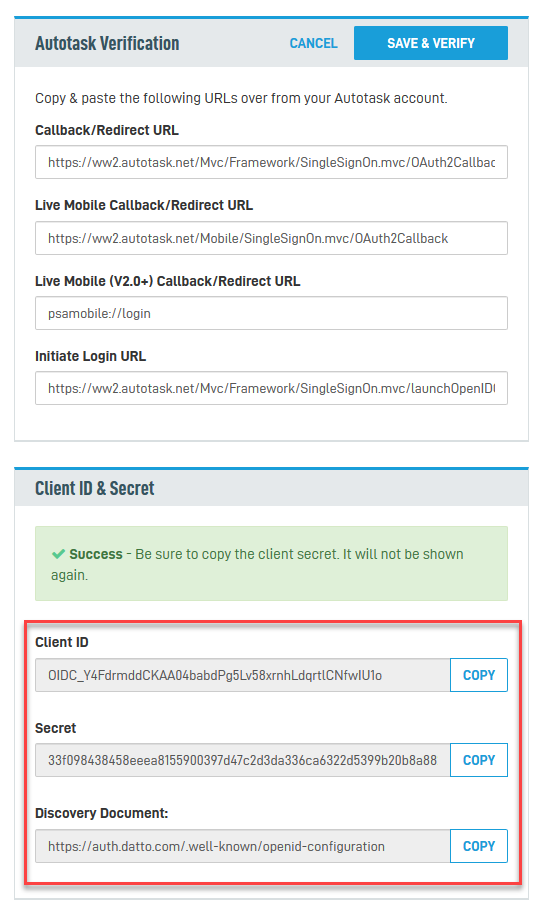
In the Partner Portal, click Save & Verify. Authweb will generate a Client ID and a a Secret value.
-
Copy each of the following fields and paste them into the corresponding fields on the Autotask Single Sign-On (OpenID Connect (OIDC)) page.
IMPORTANT The Secret value will not be available after you navigate away from the page. You must copy and paste it into Autotask immediately, or click Regenerate Secret and copy the new one into Autotask.
-
Proceed with configuring individual user accounts.
- In Autotask, under the Single Sign-On is: heading, select Enabled for selected resources using Identity Provider's Name Identifier (see Resources tab). This will enable the Resources tab.
- Click the Resources tab.
- In the Partner Portal > Admin > Security Settings, scroll to Autotask SSO. All employees who have a user account on the Partner Portal are listed there.

- To enable single sign on for a user, click the slider in the Is PSA User column and copy the user's Application User UUID.
- If you are configuring access for the Dashboard User (a user account used for presentation mode), also click the slider for PSA Dashboard User Access. This will enable the dashboard user to be logged in indefinitely, since it would be inconvenient to come into work every morning and have to log in to Authweb/Autotask on the office TV. Refer to Dashboard User (system).
NOTE When you select a dashboard account on the Authweb account selection, you also lose the ability to switch accounts.
- In Autotask, locate the user and paste the UUID into the field in the Unique ID column. Select the check box in front of the user's name.

Repeat this process for all users who will be logging into Autotask using single sign on. - Click Save. Single sign-on is now enabled for the selected users.
- On the General tab, click Test. If you are not logged into Authweb when you click Test, you will be prompted to do so.
A message window will confirm that the Client ID, Client Secret and OpenID Connect Discovery Document are all valid. - Click OK.
For information on the various ways of logging into Autotask when SSO is enabled, refer to Authweb Login Workflows.


