Configuring single sign-on using the OpenID Connect standard
PERMISSIONS Security level with Admin permission to configure Resources/Users (HR) and system administrator role for the Identity Provider
NAVIGATION Left Navigation Menu > Admin > Admin Categories > Organization Settings & Users > Resources/Users (HR) > Security > Single Sign-On (OpenID Connect (OIDC))
Overview
IMPORTANT When you enable Single Sign-on, the login is handled by the identity provider, and Two-factor Authentication that was set up before SSO was implemented is ignored.
Autotask supports single sign-on (SSO) for Autotask, the Microsoft Outlook Extension, and LiveMobile, using the OpenID Connect standard.
Support for OpenID Connect allows businesses that use many applications to take advantage of the benefits of Single Sign-On (SSO):
- Businesses can delegate user authentication and provisioning to a dedicated, purpose-built service, called an Identity Provider (IdP), providing better security.
- Businesses can disable access to multiple applications by inactivating the user account with the Identity Provider
- Users no longer have to create separate logins and passwords for each application.
- 2-factor authentication is not required when SSO is enabled.
We have tested the integration with several identity providers, but we fully expect the integration to work with most IdPs using OpenID Connect protocols. For a list of certified OpenID Connect providers, refer to OpenID Certification.
NOTE We have currently identified one certified OpenID provider whose implementation does not work with the Autotask Integration, Microsoft ADFS on Windows Server 2016. Microsoft Azure AD is supported; refer to the note below.
Before you set up single sign-on, make sure the following tasks are completed:
- Ensure that you are fully set up with your external identity provider.
- Users who will authenticate using SSO must be set up with a user account before you configure the integration.
- Single sign-on users who use the Microsoft Outlook Extension or LiveMobile must download the newest versions: Outlook Extension version 3.3.3 or later, LiveMobile iOS 1.12/Android 1.11, or later.
We are providing additional documentation for the following vendors who use the OpenID Connect standard. Use these instructions in conjunction with this topic.
- Auth0: Configuring Autotask SSO with Auth0
- Datto: Configuring single sign-on with Datto SSO (Authweb)
- Microsoft Azure AD: Configuring SSO for Azure AD and Entra ID
- Okta: Configuring Autotask SSO with Okta
Configuring Single Sign-On (OpenID Connect)
NOTE The instructions in this topic are vendor-neutral, and focused on the Autotask end of the configuration. Refer to Configuring Autotask SSO with Auth0.
BEFORE YOU BEGIN On the Identity Provider website, add Autotask as an application. For examples, refer to Provider-specific configuration info.
Using an Admin account, open both Autotask and your Identity Provider application.
- Open the Single Sign-On (OpenID Connect) page. To open the page, use the path(s) in the Security and navigation section above.
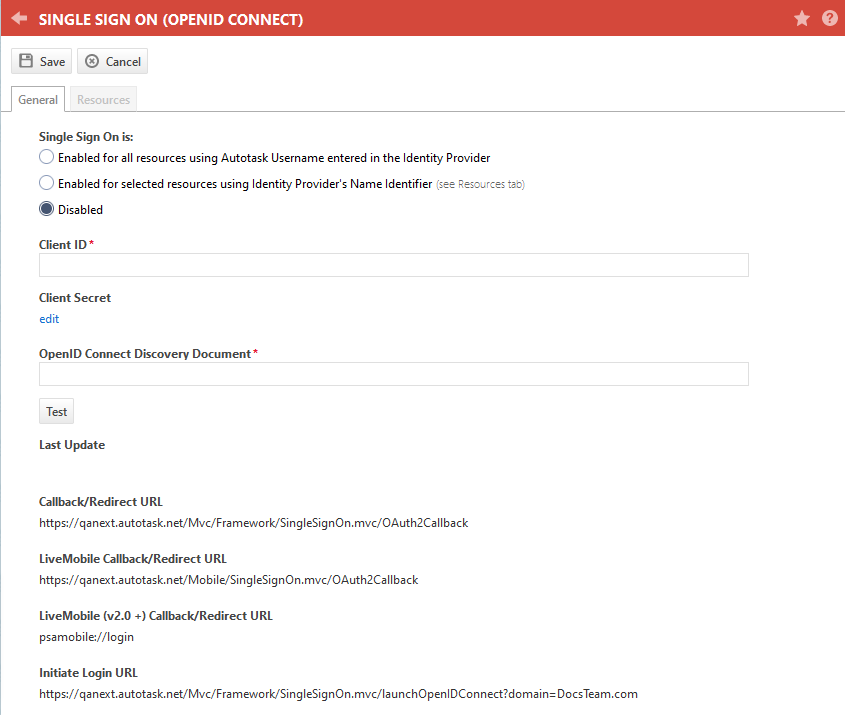
- Populate the following fields:
| Field | Description |
|---|---|
| General tab | |
| Single Sign-On is: |
The Disabled option is selected by default. Use the radio button to select one of the following options:
NOTE Resource-level configuration in Autotask is not necessary, but the administrator of your Identity Provider account must create a custom attribute called autotaskuser, and set that attribute for each resource to be their Autotask username. Refer to the following Okta article for directions: Add custom attributes to an Okta user profile.
NOTE You must also use this option if your IdP is Azure AD or another provider that does not support custom attributes being exposed via OpenID Connect. |
| Client ID* | Copy the Client ID field from the application setup page of your Identity Provider. |
| Client Secret* |
Copy the Client Secret field from the application setup page of your Identity Provider.
NOTE Once configured, this field value is both encrypted at rest, and obfuscated in Autotask. The value can be edited, but not viewed. |
| OpenID Connect Discovery Document* |
Enter the OpenID Connect Discovery Document URL of your Identity Provider. Typical protocol: add /.well-known/openid-configuration to the URL of your Identity Provider. EXAMPLE https://YOUR_DOMAIN.okta.com/.well-known/openid-configuration where https://YOUR_DOMAIN.okta.com is the Admin URL for the IdP. |
| Test | You must click the Test button to test that the supplied Client ID, Client Secret, and OpenID Connect Discovery Document are valid. If they are, you will receive a confirmation message. If one of the three is not valid, you will receive an error message. IMPORTANT You will not be able to proceed until you have successfully tested the configuration. |
| Last Update | A read-only field that displays the user, date, and time of the last update. |
| Callback /Redirect URL |
These are the URLs where the Identity Provider will send responses to authentication requests. To configure the integration, copy these Autotask fields and paste them into the Callback /Redirect URL fields of your Identity Provider application. |
|
LiveMobile Callback/Redirect URL (if using the legacy version of LiveMobile) |
|
|
LiveMobile (v2.0 +) Callback/Redirect URL (if using the new version of LiveMobile) |
|
| Initiate Login URL |
Copy this field and paste it into the Initiate Login URL field of your identity provider. This will allow users to bypass the Autotask log in page. Once users have authenticated with the identity provider, they can click the Autotask tile to open Autotask. |
| Resources tab | |
|
Unique ID |
If you enabled single sign-on for selected resources, click the Resources tab. All active resources in your Autotask instance are displayed.
NOTE The Unique ID is typically located in your profile in the SSO application. |
Single sign-on is now enabled for all, or for selected users.
- For information on logging into Autotask from the login page when SSO is enabled, refer to Logging in using single sign-on (OpenID Connect) .
- A better option is to provide the Initiate Login URL to your users, so they can bypass the Autotask login page.
Using Autotask LiveMobile with Single Sign-On (SSO)
If you would like to use SSO with LiveMobile, you must update your SSO application to redirect to the mobile login page. Here are the steps for the three SSO applications we have tested:
- Login to YOURDOMAIN.okta.com.
- Select Admin.
- Select Applications.
- Select your app.
- Select Edit for general.
- Under Login, add “psamobile://login” to the Login redirect URI’s section.
- Click Save.
- Sign in to manage.auth0.com.
- On the left menu, select Applications.
- Select your application from the list.
- Add “psamobile://login” to the Allowed Callback URLs section.
- Select Save Changes.
- Sign in to portal.azure.com.
- Select Azure Active Directory.
- Select App registrations (preview).
- Select your Azure app and click the Authentication tab.
- For Public Client (mobile & desktop), set the redirect URI to “psamobile://login.”
- Click Save.
NOTE If you are using LiveMobile 1.0 on any platform, continue to use the LiveMobile Callback/Redirect URL.
Disabling Single Sign-On
You can disable individual users on the Resources tab. To disable Single sign-on for your entire local organization, do the following:
- In Autotask, navigate to Left Navigation Menu > Admin > Admin Categories > Organization Settings & Users > Resources/Users (HR) > Security > Single Sign-On (OpenID Connect (OIDC)).
The Single Sign-On (OpenID Connect) page opens to the General tab.
- Toggle the Single Sign-On is: radio button to Disabled. The page validation is removed.
- Optionally, delete or change the information in the remaining fields so the integration is not accidentally re-enabled.
- Click Save.
NOTE When the master SSO setting is changed to Disabled, you don't have to disable individual users. Upon their next log in, these users will be prompted for two-factor authentication.


