Extension Callout (Tickets)
PERMISSIONS Security level with Admin permission to configure Other Extensions & Tools. Refer to Admin security settings.
NAVIGATION Left Navigation Menu > Admin > Admin Categories > Extensions & Integrations > Other Extensions & Tools > Extension Callout (Tickets)
About extension callouts for tickets
Extension callouts enable automatic round trip ticket closure for third-party Remote Monitoring and Management (RMM) integrations.
- They store authentication and format information provided by the remote monitoring application. The Autotask Web Services API uses this information to send data directly to the remote monitoring application.
- They are triggered by service desk workflow rules associated with the extension callout. The workflow rues are configured to automatically perform certain actions when specific events happen and conditions are met. One of the actions a service desk workflow rule can perform is to trigger an extension callout. Refer to Then Execute Extension Callout:.
- You can use Autotask ticket User-Defined Fields (UDFs) to filter which tickets will trigger the extension callout response. When the extension callout specifies a Service Desk UDF, the callout is triggered only for tickets that have a value in that UDF. There is no limit on the number of extension callouts you can create, so you can set up separate extension callouts for different UDFs and for multiple remote monitoring applications.
- The notification feature allows you to automatically notify one or more resources whenever a ticket triggers the callout response. You can also choose to notify resources only if there is an Extension Callout failure.
Requirements the 3rd party integration must meet
The RMM integration service provider's API must be set up to use the data provided by Autotask. You must ensure that:
- The integration uses the Autotask Web Services API for automatic ticket creation in Autotask.
- The integration's API can use the data string provided by Autotask to complete the ticket closure.
- The integration service provider can provide the authentication and format information needed to complete the extension callout.
If your integration service provider has questions concerning the technical requirements, contact Kaseya Helpdesk.
| Data sent | Description |
|---|---|
|
|
TicketID: can be used to identify the ticket when making a subsequent Web service call back to Autotask. |
|
|
TicketNumber: can be used in the Autotask UI to locate the ticket. |
|
|
TicketStatus: the current status of the ticket. |
|
|
TicketCreatedDateTime: the date and time the ticket was created. Time is reported in Eastern time. |
|
|
TicketLastActivityDateTime: Time is reported in Eastern time. |
|
|
The client's Autotask login domain |
|
|
TicketUDFValue (Note that extension callouts work only with UDFs where Data Type = String). |
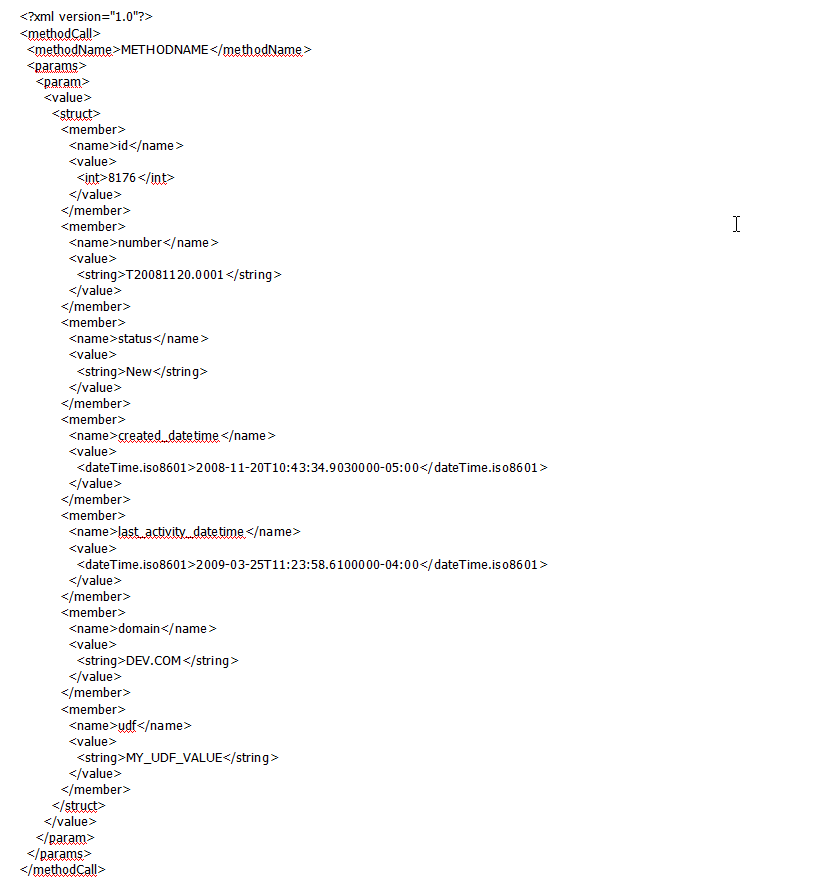
For samples of possible data formats, refer to Data format samples.
The following samples are examples of different data format types that might be used by RMM integrations receiving extension callouts.
Name Value
id=8176&number=T20211120.0001&status=New&created_datetime=2021-11-20T10:43:34.9030000-05:00&last_activity_datetime=2022-03-25T11:23:58.6100000-04:00&domain=DEV3.COM&udf=MY_UDF_VALUE
Soap
<?xml version="1.0" encoding="utf-8"?>
<soap:Envelope xmlns:xsi="http://www.w3.org/2001/XMLSchema-instance" xmlns:xsd="http://www.w3.org/2001/XMLSchema" xmlns:soap="http://schemas.xmlsoap.org/soap/envelope/">
<soap:Body>
<#METHODNAME xmlns="NAMESPACE">
<id>8176</id>
<number>T20211120.0001</number>
<status>New</status>
<created_datetime>2021-11-20T10:43:34.9030000-05:00</created_datetime>
<last_activity_datetime>2022-03-25T11:23:58.6100000-04:00</last_activity_datetime>
<domain>DEV.COM</domain>
<udf>MY_UDF_VALUE</udf>
</#METHODNAME>
</soap:Body>
</soap:Envelope>
Where NAMESPACE = #SOAPACTION.Replace(#METHODNAME, '')
ie. #SOAPACTION = "http://tempuri.org/MyWebMethod"
#METHODNAME = MyWebMethod
NAMESPACE = "http://tempuri.org"
XMLRPC
Creating and managing extension callouts
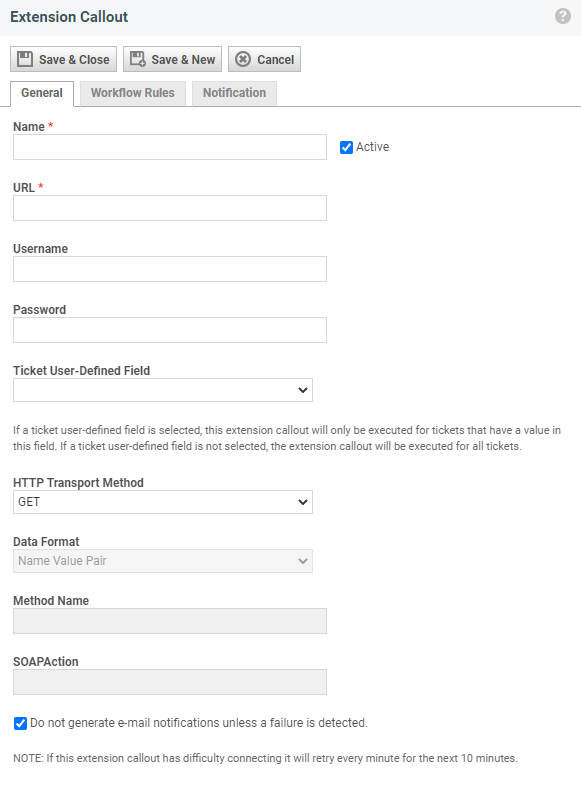
Extension callouts are created and managed on the Extension Callout (for Tickets) page.
- The table shows the names of all extension callouts, the URLs the data is sent to, the number of associated workflow rules, and if the callout is currently active.
- The context menu allows you to edit, activate/inactivate, and delete callouts.
- A New button above the table allows you to create new callouts.
BEFORE YOU BEGIN To fire, extension callouts must be associated with at least one ticket workflow rule that will trigger the callout. Make sure this workflow rule is available when you create or edit the extension callout. Refer to Configuring a workflow rule to trigger the extension callout.
To create or edit an extension callout, do the following:
- To open the page, use the path(s) in the Security and navigation section above.
- Click New or select Edit on an existing callout.
- Populate or modify the following fields:
| Field | Description | |||||||||||||||||||||
|---|---|---|---|---|---|---|---|---|---|---|---|---|---|---|---|---|---|---|---|---|---|---|
General tab |
||||||||||||||||||||||
| Name (Required) | Enter a name for the extension callout. This name will appear in the Extension Callout list page and should contain the name of the RMM application that will receive the callout. | |||||||||||||||||||||
| Active | Selected (Active) by default. Clear the check box if you want the extension callout to be inactive. Inactive callouts appear in the list but are not available for use. | |||||||||||||||||||||
| URL (required) | The URL used to access the remote monitoring service API, as provided by the remote monitoring service provider. | |||||||||||||||||||||
| Username | The username used to authenticate to the remote monitoring service API, as provided by the service provider. | |||||||||||||||||||||
| Password |
The password used to authenticate to the remote monitoring service API, as provided by the service provider. NOTE The password is masked and encrypted and is not visible to the API user when editing or creating an extension callout. |
|||||||||||||||||||||
| Ticket User-Defined Field |
One of the ways to filter the tickets that will generate an extension callout is to use a UDF. When you select a user-defined field, the extension call will be triggered only for tickets that contain data in the selected UDF. NOTE Only UDFs with a field type of Text are supported. For additional information on UDFs, refer to Managing user-defined fields. |
|||||||||||||||||||||
| HTTP Transport Method | The transport method required by the remote monitoring service API, as provided by the integration service provider. Note that the selection made here will impact the three fields below. Refer to the table to the right for a description of the valid combinations available for the two HTTP transport method options, GET and POST. | The following table describes the interaction between the HTTP Transport Method, Data Format, Method Name, and SOAP Action fields.
|
||||||||||||||||||||
| Data Format | The data format required by the remote monitoring service API, as provided by the integration service provider. Refer to the table to the right for a description of the interaction with the HTTP transport method, method name, and SOAP action fields. | |||||||||||||||||||||
| Method Name | The name of the method that will be called on the Remote Monitoring Service server, as provided by the integration service provider. Refer to the table to the right for a description of the interaction with the HTTP transport method, method name, and SOAP action fields. | |||||||||||||||||||||
| SOAP Action | Data for the HTTP Request Header that must be sent when the data format is SOAP, as provided by the integration service provider. This field is enabled only when the data format is SOAP. | |||||||||||||||||||||
| Do not generate e-mail notification unless a failure is detected. |
Select this check box to send email notification only if the extension callout fails. IMPORTANT Make sure to select a recipient on the Notification tab. |
|||||||||||||||||||||
| Workflow Rules tab | ||||||||||||||||||||||
| Workflow Rule Name |
An extension callout must be associated with a Workflow Rule that has been set up to trigger the extension callout. This tab is automatically populated with the name of one or more workflow rules that have been configured to trigger the callout. NOTE You cannot select workflow rules on this page. |
|||||||||||||||||||||
| Active | Indicates whether the workflow rule is active. Inactive workflow rules do not fire. | |||||||||||||||||||||
| Notification tab | ||||||||||||||||||||||
| Notification |
Click one or more check boxes to select Autotask resources who will receive notifications when the extension callout is triggered. If the resource has multiple email options, select the preferred options. IMPORTANT All selected recipients will be notified when a callout is triggered. To trigger notifications only if a callout fails select the Do not generate e-mail notifications unless a failure is detected check box on the General tab. NOTE If no notification is sent, no note is added to the ticket. |
|||||||||||||||||||||
- Click Save & Close.
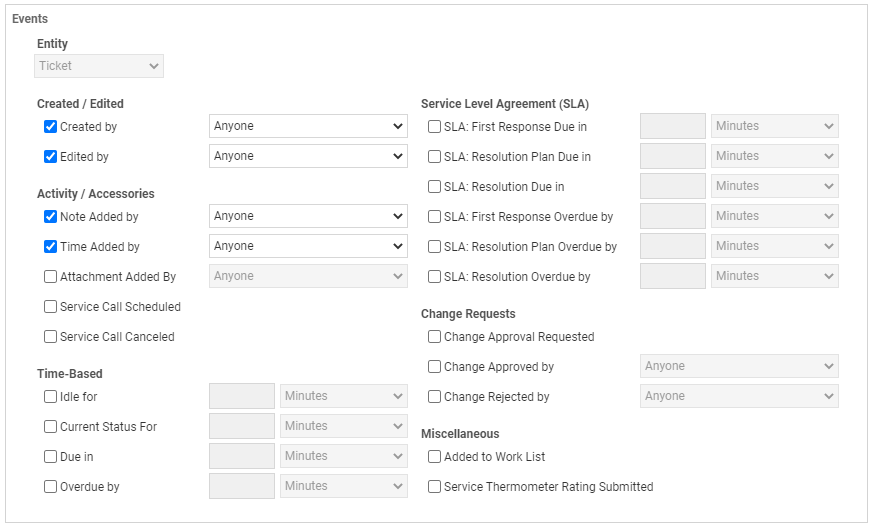
You can edit an existing workflow rule to trigger the extension callout or create a new rule. If you are unfamiliar with Autotask workflow rules, you can get your extension callouts up and running with a very simple workflow rule. The basic rule will trigger the extension callout for the ticket-related events specified in the table below.
You can return if you like at a later time to edit the rule and refine the conditions that trigger the extension callout. Refer to Adding, editing, and copying workflow rules.
- Navigate to Left Navigation Menu > Admin > Admin Categories > Automation > Workflow Rules > Workflow Rules > Workflow Rules.
- On the Service Desk tab, click New.
- Set up the new workflow rule as described below.
- Click Save and Close.
- Return to the extension callout and check that the workflow rule appears on the Workflow Rules tab. The workflow rule must be active to trigger the extension callout.
TIP If you selected a UDF when you set up the extension callout, the callout will only be triggered by tickets that have a value in the selected UDF.
Error handling
Extension Callout GET or POST requests can return success and error codes. The success response value is 200; error response values are 4xx and 5xx.
When an error occurs, Autotask will resend the callout every 60 seconds for up to 10 times. This allows the call to be received if a service is temporarily unavailable or a brief internet outage occurs.
IMPORTANT Make sure to select a recipient on the Notification tab.


