Auditing workflow rules
PERMISSIONS Security level with Admin permission to configure Workflow Rules. For Service Desk workflow rules only, Admin permission to configure Service Desk (Tickets). Refer to Admin security settings.
NAVIGATION Left Navigation Menu > Admin > Admin Categories > Automation > Workflow Rules > Workflow Rules > Audit Workflow Rules
NAVIGATION Left Navigation Menu > Admin > Automation > Workflow Rules > Workflow Rule Audit
The workflow rule audit allows you to check the health of your set of workflow rules. It will notify you if you are approaching the upper limit of 200 allowed active workflow rules, if there are inactive or deleted values in your workflow rules, or if there are rules that have not been triggered in the last ninety days.
The following items are checked for by the audit:
- Approaching Active Rule Capacity: The total number of active workflow rules is within 10 rules of the upper limit on the number of workflow rules for your Autotask instance.
- Has Inactive User Defined Fields: The workflow rule references a user-defined field that has been inactivated.
- Has Inactive Static Notification Recipients: The resources who are supposed to receive the notifications were selected by name instead of based on their role and they have since been deactivated. As a result, the notifications may not reach the intended recipients or anyone. To fix this problem, replace the static recipients with role-based recipients. Refer to Role-based notification recipients.
- Has not triggered recently: The workflow rule has not fired in the last 90 days.
- Has attribute with inactive/deleted value: Attributes are the fields that contain the data for the entity. Many attributes are based on a selection of available values. This reason will appear if the specific value the workflow rule is based on or referencing has been inactivated or deleted.
If your company has automated your workflows - and we hope you have! - you may have up to 200 active workflow rules. These workflow rules may have thousands of potential attributes (that is, fields), which in turn may have tens of thousands of potential field values. Any of these fields and field values may be referenced in a workflow rule condition, action, or update.
As time goes by, all of the following will happen:
- An employee leaves your company. You inactivate or redact her resource record, but unbeknownst to HR, she was the only person who was notified when the "Critical ticket missed SLA Resolution" workflow rule fired.
- People get promoted and take on new roles. If they are referenced by name instead of by role, they will continue to receive notifications that now should go to their replacement.
- A new service manager is updating your ticketing workflow. The lists of your ticket priorities and statuses are updated and unused ones are inactivated. The workflow rules based on these values are orphaned and will not fire going forward, but they are still active and count towards your workflow rules limit.
- A new person is put in charge of the workflow rules for a specific entity. They did not create the original set of workflows and may not understand how they all work together. They inactivate some and add new ones, inadvertently causing a loop.
As a result, your workflow rules no longer perform as expected. However, combing through them to find these issues is a difficult and time-consuming task, a task that is made a lot easier by running an automated workflow rule audit.
To run the workflow rule audit, do the following:
- To open the page, use the path(s) in the Security and navigation section above.
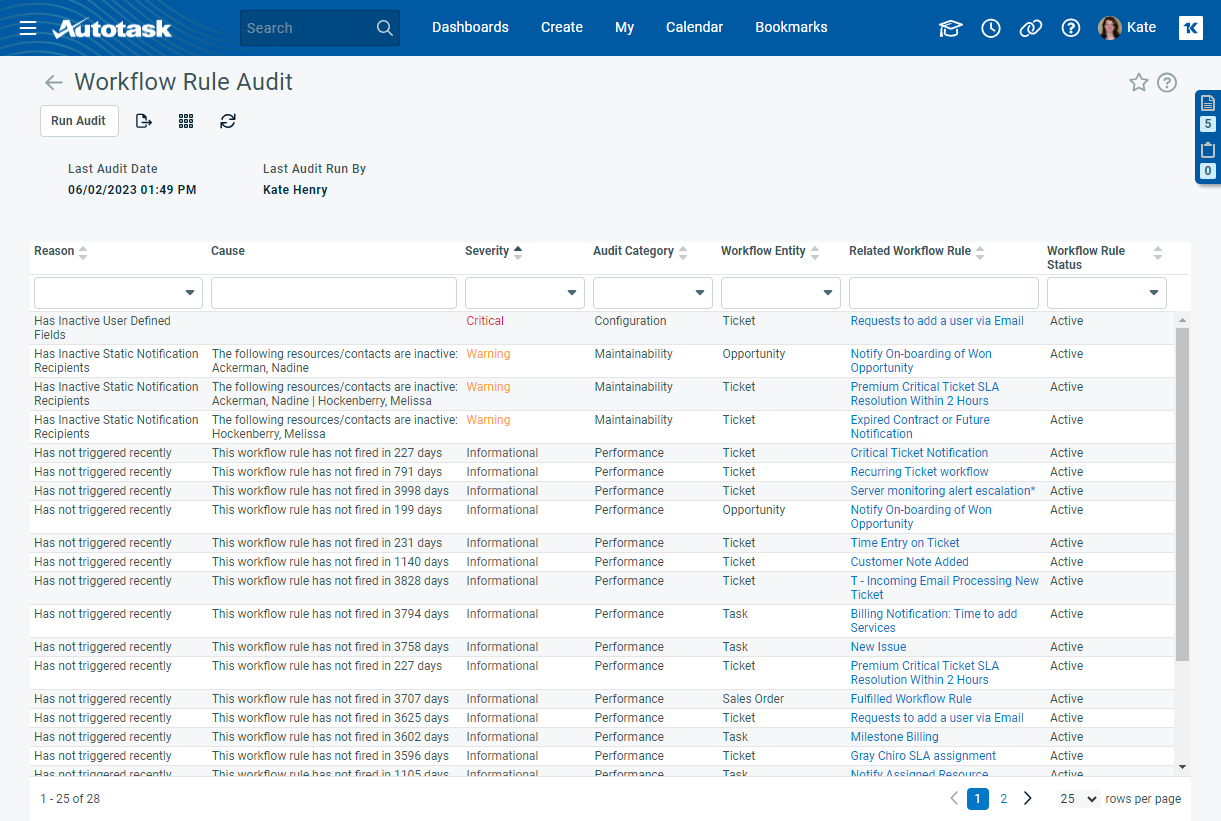
- Select Run Audit. Autotask will perform an audit on all the rules in your Autotask instance. The audit results may not appear immediately. Depending on the number of workflow rules (both active and inactive rules are reviewed), this may take several minutes. Click Refresh
 to see the latest results.
 - Review the results.
At the top of the page, you will see the time stamp of the last audit and the name of the user who ran it.
The audit results are presented in a table with the following columns. All columns have a quick filter, allowing you to reduce the number of results that appear at a time.
| Column | Description |
|---|---|
| Reason |
This column will list one of the following reasons why a workflow rule failed the audit:
EXAMPLE Entity: Contact, Attribute: Last Name, Status: inactivated. |
| Cause |
This column provides more detail about the reason for failure. EXAMPLE It will provide the exact number of days the workflow rule hasn't fired, or the names of the inactive resources or contacts. This will give you the information necessary to fix the issue. IMPORTANT When the cause lists a reference to a non-existent value, that value will not appear on the workflow rule when it is opened for review. Instead, the next value on the list will appear in its place. You should not save the rule until you have changed that attribute to the one you intend the rule to use. You can review the rule, but you should select Cancel to close the rule after it is reviewed. |
| Severity |
This column indicates the impact of the audit failure.
|
| Audit Category | The audit category indicates the type of issue that cause the audit failure.
|
| Workflow Entity | This column shows the entity the workflow rule is associated with. |
| Related Workflow Rule | This column lists the specific workflow rule that failed the audit as a hyperlink. If you click the link, the Edit Workflow Rule - <Workflow Rule Name> page will open. Modify the workflow rule and remove the reason for failure. To confirm that the modification fixed the problem, run the audit again. |
| Workflow Rule Status | This column indicates whether the workflow rule is active or inactive. You can use the quick filter at the top of the column to filter by status. |
The following buttons appear below the page title:
| Button | Description |
|---|---|
|
Run Audit |
Click to run an audit. The audit may take several minutes to be completed. |
|
PERMISSIONS By default, Export is available to users with Admin security level and disabled for all others. It can be enabled for other security levels. Refer to Can export Grid Data. NOTE When exporting to CSV: To ensure consistent date/time formatting in the CSV output, we strongly recommend that the user’s date/time format settings in Autotask be identical to the Windows date/time format settings of the computer performing the export. This will prevent conflicts in how the software that generates the report interprets the date/time format.
NOTE Note that only the selected columns of the first 5,000 records will be exported. IMPORTANT The export file does not contain all fields that are required to re-import the data using the data import templates, and the data headers do not match. |
|
|
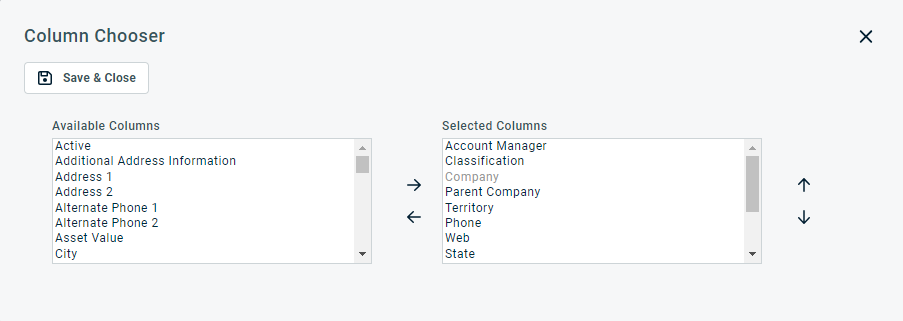
The Column Chooser allows you to customize search results tables throughout Autotask. It determines the following:
NOTE Column Chooser settings on search results tables and some standard reports are part of the user settings stored on the Autotask server. You can log in from any computer and have your column chooser settings applied to your Autotask session. To clear the data stored in your Autotask instance and reset the column chooser settings to the Autotask default settings, click Reset Settings in My > Miscellaneous > Settings. To customize the table, do the following:
Columns appear either in the Available Columns or the Selected Columns panel.
NOTE Top-to-bottom order in the Selected Columns list becomes left-to-right order on the Search Results list.
TIP If the characters + # appear after the column name, then that column may have multiple items returned for some rows. If that occurs, the first item will appear in the row followed by + and the number of additional items returned. To display the list of additional items, hover over the item in the column. |
|
|
Click the refresh icon |


