The Details tab
NOTE This topic describes the Details tab of the New Category and Edit Category pages. The page has two additional tabs: General tab and Insights tab. For details on these tabs, refer to The General tab and The Insights tab.
About the Details panel
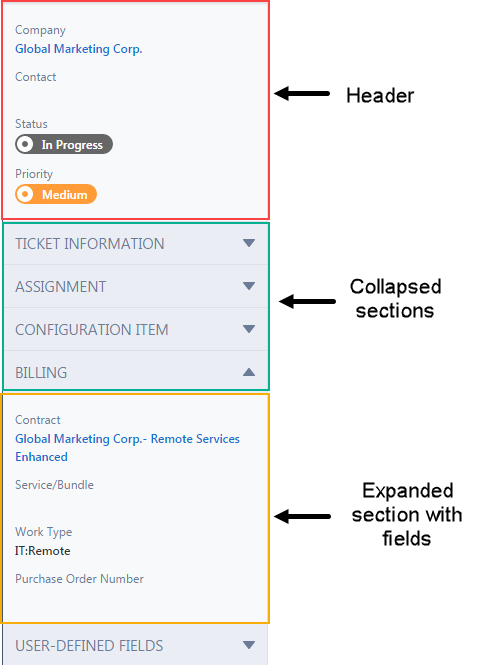
The Details panel is always located to the left of the Main panel. It includes a fixed header that is always shown and a variable number of additional sections that can be expanded and collapsed. They contain the entity fields that are exposed by the category, including User-Defined Fields.
About the Details tab
On the Details tab of the New Category and Edit Category pages, you configure the Details panel of the associated entity, including the fields that appear, and how they are organized.
The tab has two expandable sections: Header and Sections & Fields.
The Header section is located at the top of the Details panel and is always expanded. It contains specific fields that are important for the entity. The following fields appear in the Header sections of the various entities. Items in bold are always visible; items in normal font can be shown or hidden by the category.
| Organization | Device | Opportunity | Task | Ticket |
|---|---|---|---|---|
|
Account Manager Primary Contact Billing Contact Classification Status |
Organization Contact Status |
Organization Contact Status Stage Projected Close Close Date Lost Date |
Organization Project Status Priority |
Organization Contact Status Priority |
For information on managing the field properties of Header fields, refer to Configuring field properties.
In the Sections & Fields section of the Details tab, you create and manage Details panel sections, and expose or hide entity fields. You also configure the properties of each field:
- The default value or selection for the field, if any
- The available list values for List type fields
- Whether the field is required
Entity fields, including UDFs, can be placed into any section. UDFs are identified by the [UDF] appended to their name.
For information on managing sections and fields, refer to Sections & Fields.
Sections & Fields
Sections are used to organize the entity fields. Related fields should be in the same section.
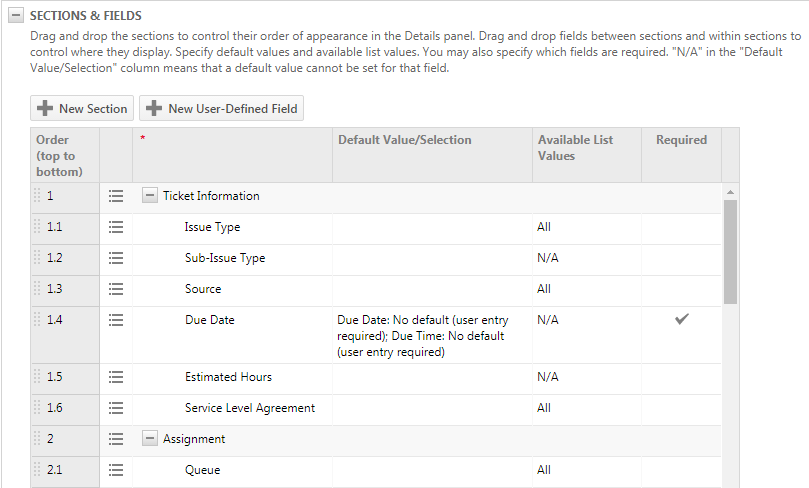
In the Sections & Fields table, you create the sections that will appear on the Details panel, and then add fields to the sections. You can create up to 20 sections, but there is no limit to the number of fields in a section.
EXAMPLE On a ticket, the Primary Resource, Secondary Resource(s), and Queue fields have to do with ticket assignment and should be in the same section.
All fields must be in a section, so you must first create the sections you will need and then move the fields into the sections.
On the far left of the table is an order column that shows a number for each row. The number indicates the position of the section or field on the Details panel.
- The whole numbers (1, 2, 3) are the section rows. They display a Section Label and an icon that allows you to expand or collapse the section.
- The indented rows under the section row are field rows. Field row numbers include the section number and a decimal number (1.1, 1.2, 1.3). The decimal numbers indicate the sort order of the fields within the section.
- The Hidden Fields row is the last section row in the table. All available fields that have not been added to a section appear below the Hidden Fields row. For the implications of hiding fields, refer to Implications of hiding fields.
The remaining table columns display the field properties. Refer to Configuring field properties.
- Click New Section. A new section row is added to the table directly below the last visible field in the last section above the Hidden Fields row.
To position the new section below a specific section rather than above the Hidden Fields section, select the last field row in that section and click New Section. - Enter the Section Label in the text field and click OK.
NOTE A section will not appear on the Details panel unless it contains at least one field.
Sections appear on the Details panel in the same order they appear in the table.
To change the order of the section rows:
- Select a section row in the Order column and drag it to a different position directly above another section row. The field rows in that section will move with it.
- Repeat with additional sections until they are in the order that you want.
NOTE You cannot move a section row between two field rows.
To hide an entire section, select Hide Section from the section row's context menu. All fields from the section will be moved below the Hidden Fields row, and the section row will be deleted.
All system and user-defined fields of the entity are listed on the Sections & Fields table, either in an existing section or in Hidden Fields. To move a field to a section, do the following:
- Select a field row in the Order column and drag it to a different position in the desired section. A blue line indicates the new position of the field.

- Repeat with additional fields until they are in the order that you want.
NOTE Fields that remain in the Hidden Fields section will not appear on the entity Details panel.
IMPORTANT Hiding a field does not provide additional security. Users may still have access to hidden fields on lists and tables.
Hidden fields do not appear on items associated with the category. Any field can be hidden, except for header fields where the Visible check box cannot be cleared. Even required fields can be hidden, if they have a default value assigned that will populate them automatically.
To move a field to the list of hidden fields, do the following:
- Select Hide Field from the field row's context menu. The row will move to the last position in the list of hidden fields.
- Or, click in the field row's order column and drag and drop the field into the Hidden Fields section.
To remove a header field from display, clear the check box in the Visible column.
NOTE Form templates are considered the equivalent of manual data entry and do not populate hidden fields.
NOTE When an item is edited, data in hidden fields can be automatically modified. For the implications of hiding fields, refer to Implications of hiding fields.
PERMISSIONS Requires security level with permission to configure Application-Wide (Shared) Features.
If you have the required security level permissions, you can add a new user-defined field directly to the Sections & Fields table. UDFs added directly to the Details tab will also be added to the User-Defined Fields page ( Left Navigation Menu > Admin > Admin Categories > Features & Settings > Application-Wide (Shared) Features > User-Defined Fields).
- Click New User-Defined Field above the table to open the User-Defined Field (UDF) page.
- Complete the fields and Save. For details, refer to Adding a User-Defined Field.
The new UDF will be added to the list of fields in the Hidden Fields section.
NOTE You cannot set the required status for UDFs on the User-defined (UDF) page. It must be set on the category's Sections & Fields table.
NOTE Multi Select List user-defined fields cannot be made required.
Configuring field properties
There are three field-related properties that you may be able to edit for the fields you include in the Details panel: Default values, Available List Values, and Required status. 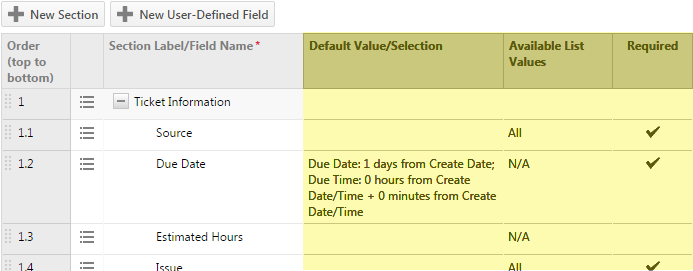
These properties are displayed in the three columns to the right of the Section Label/Field Name column. Not all properties can be set on all fields.
To edit the Default Value/Selection, Available List Values, or Required setting for a field, do the following:
- Click in the row of the field you want to edit, or select Edit from the row's context menu.
The row opens in Edit mode, and selected fields become editable.
- Make changes in the editable fields as described below.
- Click OK to save all changes for the row.
The default value will populate the field on all new items associated with the category, unless it is overridden manually or by a form template. All field types can have default values. If a new category is manually assigned to an existing ticket when the ticket is edited, the new category's default field values are not applied to the ticket.
- If a field has a default value assigned, it is displayed in this column.
- No value indicates that the field can have a default value, but none has been assigned.
- NA indicates that you cannot assign a default value to the field.
TIP If your local organization uses a Remote Monitoring and Management (RMM) integration, you may see system User-Defined Fields where the Name is the integration name followed by ID. There is no value in the Default Value column. But, for RMM ID fields, the value is automatically generated by the integration when the ticket is generated. You cannot add or edit the default value.
TIP Selections set as the default value anywhere cannot be inactivated.
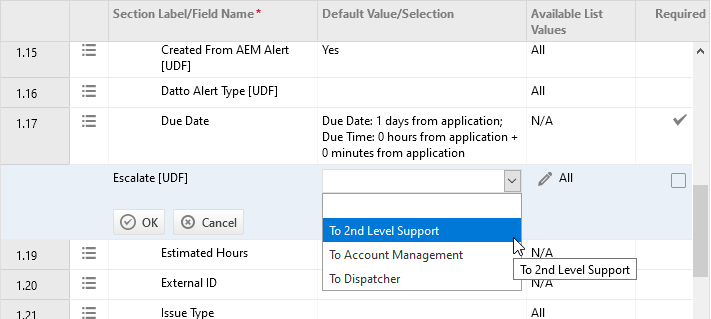
To specify or modify a default value, click on the row or select Edit Field from the context menu. The edit tools will vary depending on the field type:
| If the field ... | ...do this |
|---|---|
| Is a List field | List fields have a drop-down arrow on the right. Select a default value from the menu. |
| Is a Text field | Type the default value directly into the field. |
| Is a Date/Time field with a pencil icon |
Click the icon to open the Configure Date or Date and Time dialog. 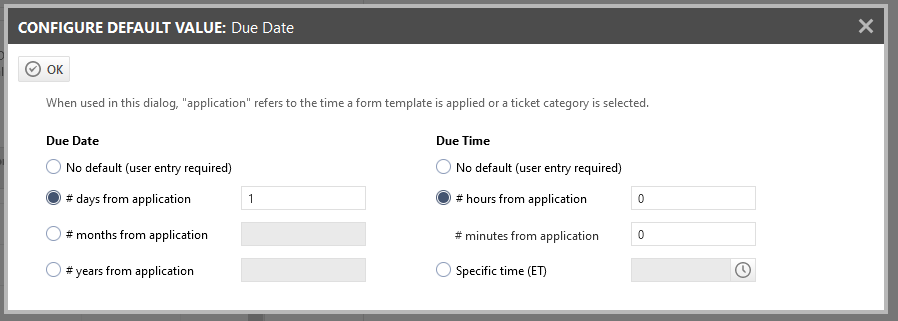 Select the radio button you want. Enter a number of hours, minutes, or a specific time as needed. For details refer to Configuring a Due Date, Due Time, or both. |
| Displays a data selector icon |
Click the icon to open the data selector. Find the item that you want as the default. Select the item, click Save or OK, and close the data selector. |
All entity categories include a number of date and time fields (variously called Start Date, End Date, Due Date, Install Date, etc.). Some, for example the opportunity's Projected Close date, are always required. Some are required under certain circumstances. Setting default dates and times also helps keep track of things. Workflow rules fire based on due dates, and many dashboard widgets are date-driven, as well.
IMPORTANT If one or more Incoming Email mailboxes are configured to use the ticket category's Use Default Due Time from Ticket Category, then the ticket category Due Date and Due Time must have a default value. Refer to Defaults section.
The default for a date or time field is calculated based on the date and/or time the category (or form template) was applied to the item. In the Configure Default Value dialog, complete fields as described in the following table.
| Field | Description |
|---|---|
| Due Date (select one option) | |
| No default (user entry required) | Select if you do not want the field to have a default Due Date. Users must provide the date when creating the ticket. |
| # days | months | years from application | Select to set the Due Date to a specified number of days, months, or years from the date the form template or category was applied. Enter the number of days in the text field. |
| Due Time (select one option) | |
| No default | Select if you do not want the field to have a default Due Time. |
| # hours | minutes from application | Select this radio button to set the Due Time to a specific number of hours, minutes, or hours and minutes from the time the form template or category was applied. Enter the number or hours, minutes, or both into the text fields. |
| Specific time (time zone of the logged in user's assigned internal location) |
Select to enter a specific time for the default Due Time for a ticket associated with this ticket category. Enter the new time directly, or click the time icon to set the time to the current time. Normally, when a user in the Eastern Time Zone enters 5:00 PM, a user in the Pacific Time Zone sees this as 2:00 PM. Setting a Specific Time means that the time is 5:00 PM for all users, whatever their time zone. |
Due Dates for tickets created in Client Portal
Tickets created by your customers in the Client Portal have their own version of ticket categories called Request Types. Field properties are configured much as they are for ticket categories. The field properties of the request type override the field properties of the ticket category that is assigned to display such tickets in your Autotask instance.
EXAMPLE If the Client Portal request type Due Date defaults to two days from the Create Date and the ticket category's defaults to five days, the Due Date will be two days from the Create Date. The ticket category's Due Date default is applied only if the request type has no Due Date default setting AND the Due Date field is hidden. For details on ticket categories and Client Portal request types, refer to How Autotask ticket categories and Client Portal request types interact.
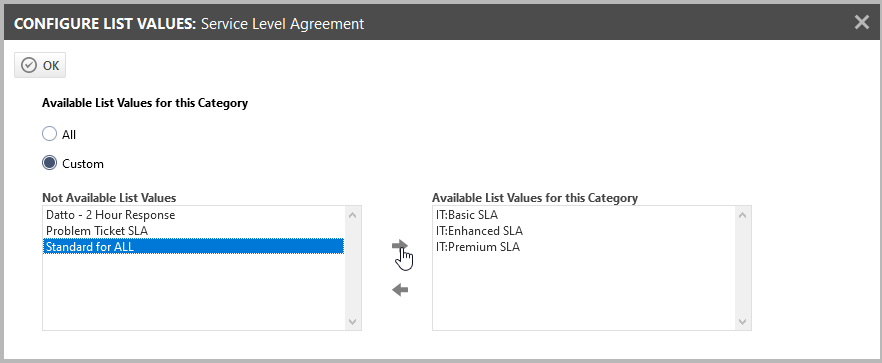
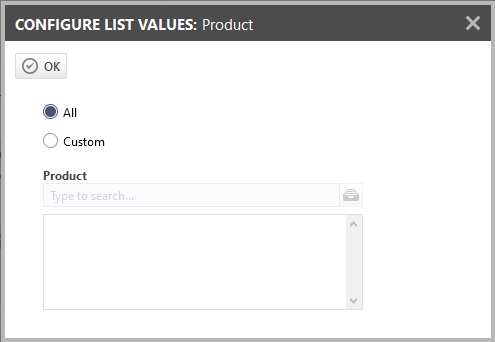
Categories allow you to limit the number of options users can select from when using the category. This will speed up data selection and avoid mistakes. This feature is available for List type fields (such as Status) and fields where you select an option from a table (such as the Products list in your Autotask instance).
EXAMPLE Your organization has ten different service desk queues, but only four of those queues are used for on-site service tickets. If this ticket category is designed for on-site service tickets, there is no need for the queue menu to show all ten queues. In this column, you can limit the menu to the four queues that the ticket might be assigned to.
In the Sections & Fields table, the following values can appear in this column:
- N/A indicates that the field does not have a preset menu of possible items for the user to select from.
- All indicates that the field has a menu or selector that currently allows the user to choose from all possible items.
- Custom indicates that the menu or selector for this field has already had changes made to the available items.
If this column displays All or Custom, when you edit the row you will see a pencil icon.
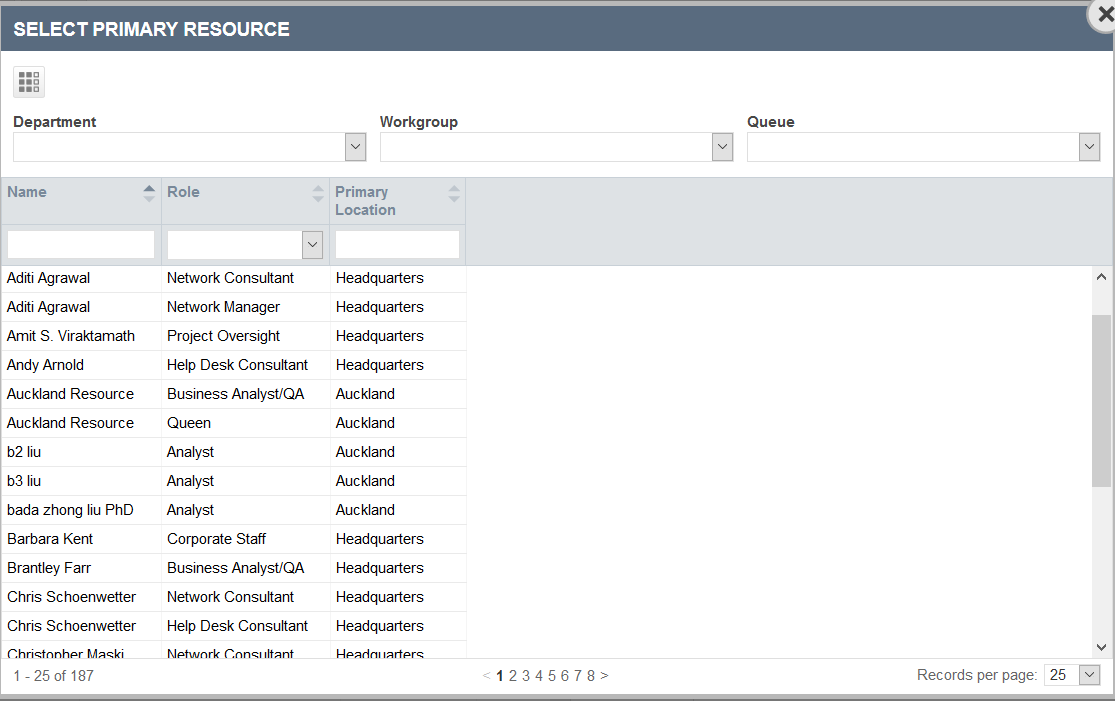
- To edit the setting, click the pencil icon. One of two dialog windows will open.
- When the data selector closes, click OK on the dialog page.
The selector window for primary and secondary resources allows you to select available resources not only by name but also based on their association with a specific department, workgroup, or queue.
Just as for other fields, you can select individual resource (role) combinations. If you do this, the list of selected resources (roles) remains static.
If you select resources based on a department or workgroup, the association is dynamic. New resources that are added to the department or workgroup are automatically included with the available list values.
NOTE If you add individual resources, departments, and workgroups to the available list values, Autotask will remove duplicates and list each resource (role) combination only once.
IMPORTANT The Primary Resource list value of Ticket Creator (Role) does not apply to Co-Managed Users.
About the Required property
Most entity fields can be set as Required by the category. Some header fields are always required and, for some fields, this property cannot be set.
EXAMPLE The Projected Close date, a Header field, is always required, as that date is needed to track the opportunity. On the other hand, Proposal Project can never be required, because the opportunity may not be associated with a proposal project.
- If a field is Required on the category, a value must be entered or selected before the user can save the item (new or edited).
- Required fields can be hidden, but they must have a default value. Refer to Implications of hiding fields.
- Category required field settings will not apply to entities created via the API.
NOTE Although Autotask no longer has a system level requirement that all tickets have a Queue or Primary Resource assigned, this either/or requirement is useful in many Service Desk workflows. The Required field setting does not support this either/or choice, so the Queue field's Required check box has been disabled and replaced by the Queue is Required setting. This setting is on the General tab of the New Ticket Category and Edit Ticket Category pages, under Other Options. Refer to Queue is Required.
Changing the Required setting
On the Sections & Fields table, required fields are identified by a check mark in the Required column. To change the setting, do the following:
- Click on a field row or use the context menu and select Edit Field. The row is put into Edit mode.
- Select or clear the check box in the Required column.
- Click OK.
Best practices:
Make the field required if:
- It provides critical information to assign or complete work on the ticket or task; for example, Issue Type, Sub-Issue Type, or Device information.
- It impacts billing: for example, if your local organization uses Work Types to adjust the base role rate for time entries on a ticket, the Work Type field must be required.
- It impacts a workflow rule or notification: for example, if you use a workflow rule to assign tickets to a queue based on the Issue Type, the rule will not be effective if Issue Type values are not provided.
- It provides data that is required by an integration; for example, in the Autotask - QuickBooks accounting integration, labor is transferred to QuickBooks under the Work Type name. If there is no Work Type name, labor is transferred to QuickBooks as generic Labor. Work Types are also mapped to the General Ledger Account and External ID numbers, which are frequently used by other accounting integrations.
Other Options
Tasks only.
The task category determines whether the task must be associated with a department. If the department is required, or the user chooses to associate the task with a department, your local organization may want to limit work types available for the task to the work types associated with the department. This option sets that limitation at the task category level.
- If Only allow users to assign work types that match the task's department is selected, the Work Type selector on the New and Edit pages for tasks associated with this category includes only work types assigned to the department associated with the task.
- If this check box is cleared, the Work Type selector lists all work types associated with the department first, followed by all work types that are not associated with any department.
