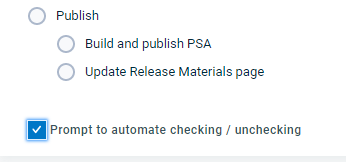
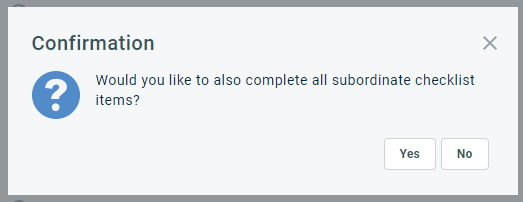
PERMISSIONS All users can add a checklist from the Checklist Library to new tickets, tasks, and opportunities they are creating or editing. They can also view checklists, complete checklist items, and uncomplete checklist items they completed themselves. Other ticket, task, or opportunity checklist permissions are configured by your administrator. Refer to Ticket Checklist Permissions or Task Checklist Permissions or Opportunity Checklist Permissions.
About checklists
The Checklist is a section that can be added to the body of Autotask entities by the item creator or a resource with permission to edit the item.
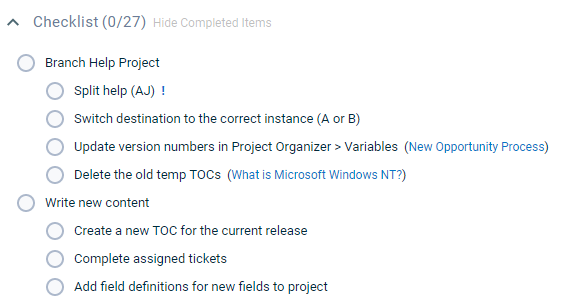
- It allows the creator (or another resource with permission to edit the item) to outline the steps that must be taken to resolve the ticket or task or pursue the opportunity.
- Checklist items can be added at the parent or child level, allowing the user to group checklist items. This makes long checklists easier to navigate.
- Important steps can be emphasized with an exclamation mark, and steps can be linked to documents or Knowledge Base articles, making this a great tool to guide less experienced team members through a step-by-step process.
- As checklist items are completed, the date, time and resource information is tracked. Managers have an instant view of who did what, and how far along the ticket is on the path to resolution.
- Workflow rules can fire on the following conditions: "Has Incomplete Checklist Item(s)" and “Has Incomplete Important Checklist Item(s)." Widget filters are available for these conditions as well.
- You can add up to 100 items to a checklist. Completed items can be hidden by the user, making longer checklists easy to navigate.
Checklists can be added to opportunities, tasks, tickets, and knowledge base articles and documents.
- Their use is always optional. If no checklist items are added, the Checklist section will not appear in View mode. It is always displayed in Edit mode.
- Users will be able to create a checklist on an article or document that can then be copied to a ticket.
NOTE You can complete and undo checklist task completion from LiveMobile. You can also use the mobile application to create a checklist if the ticket category you use has a default checklist configured.
IMPORTANT It is not possible to view or manage checklists from the Client Portal or the Outsource Portal.
How to . . .
There are several ways to add a checklist to an entity:
PERMISSIONS Can add/edit items permission is required to add, edit, or move checklist items. Refer to Ticket Checklist Permissions or Task Checklist Permissions or Opportunity Checklist Permissions.
Users with permission to add and edit items to opportunity, task, and ticket checklists can manually add checklists to these items.
To manually add or edit a checklist on the Ticket, Task, or Opportunity page, do the following:
- To open the page, use the path(s) in the The checklist section above.
- On the opportunity, task or ticket page, click Edit.
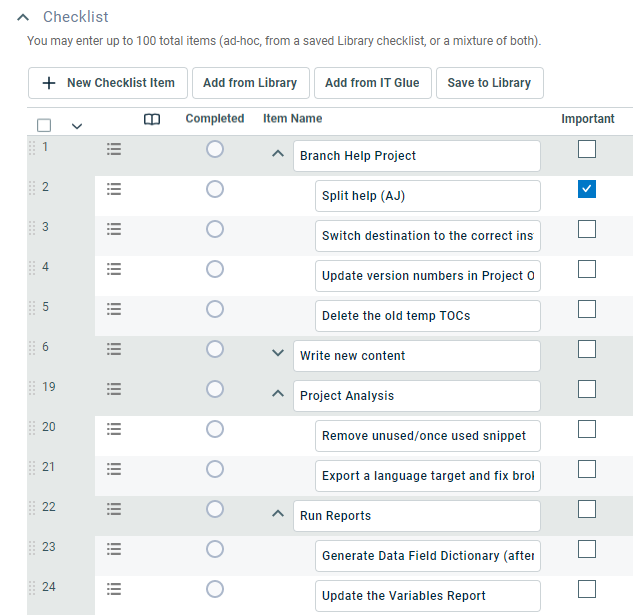
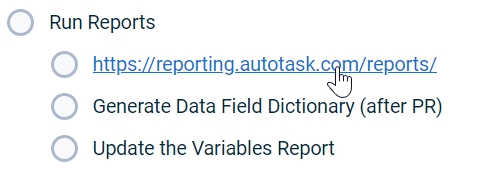
- In the Checklist section, enter the name of a checklist item into the Item Name field. You can enter a URL. When you save the checklist, it will rendered as a hyperlink that can be clicked.
- To mark an item as important and add an exclamation mark after the checklist item, select the Important check box.
- To add additional items, click New Checklist Item.
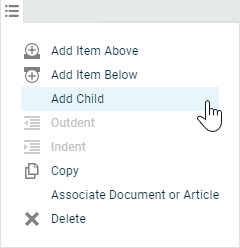
- Use the context menu to add additional checklist items and structure the checklist.
| Option | Description |
|---|---|
|
Add Item Above |
Will insert an empty row above the selected item. |
|
Add Item Below |
Will insert an empty row below the selected item. |
|
Add Child |
Will insert an empty indented row below the selected item. |
|
Outdent |
Only available for items at the child level. Clicking this option will move the item to the parent level. |
|
Indent |
Only available for items at the parent level. Clicking this option will move the item to the child level. |
|
Copy |
Will insert a copy of the current item at the end of the checklist, followed by (Copy). The copied item will be at the parent level. |
|
Associate Document or Article |
To link the item to a knowledge base article, select Associate Document or Article from the context menu. Filter or search the Select Article & Document page, and click on a row to select an item. A document |
|
Delete |
Will remove the item from the checklist. NOTE To delete the entire checklist from the ticket, use the bulk menu. Refer to Delete checklist items from a ticket, task, or opportunity. |
- To change the order of checklist items, grab the row handle to the left of the row number and drag the row to its new position.
- Click Save. The checklist is added to the page.
PERMISSIONS All users
Any user can add a library checklist to a ticket, task, or opportunity they are creating or editing.
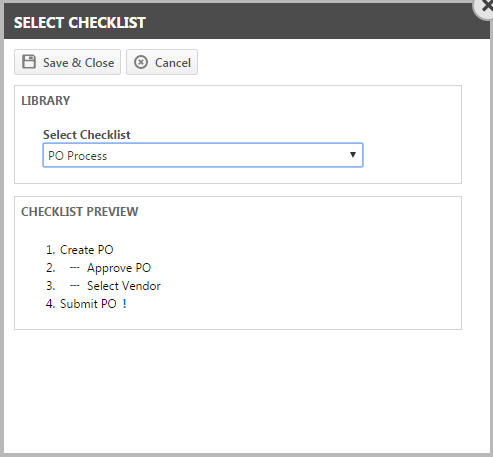
- In the Checklist section of the New or Edit Ticket, Task, or Opportunity page, click Add From Library.
A window will open.
- Select the checklist from the drop-down menu. The Checklist Preview is displayed.
- Click Save & Close to add the checklist to your ticket, task, or opportunity.
TIP Can add/edit items checklist permission is required to delete checklist items, change the item order, or combine them with manually entered checklist items.
On tickets only, users who have the IT Glue integration enabled can generate an Autotask ticket checklist from an IT Glue checklist template.
To select an IT Glue checklist template do the following:
- Create a new ticket or put an existing ticket in Edit mode.
- In the ticket Checklist section, click Add from IT Glue.

The Select Checklist window will appear.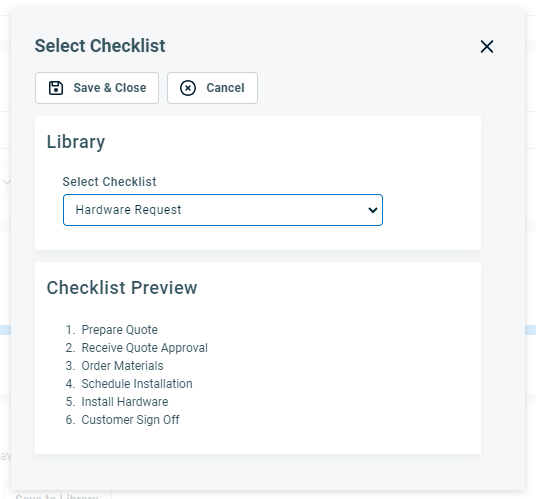
- Select an IT Glue checklist. A preview of the checklist items will be displayed.
- Click Save & Close. The checklist tasks will be added to the Autotask checklist as items, but assignees and due dates will not be created.
IMPORTANT Once added to the ticket you will be able to manage the checklist like any other Autotask checklist. No restrictions will be placed on items originating from IT Glue checklist templates. It will not be linked back to IT Glue.
PERMISSIONS All users
Checklists can be saved as part of a ticket, task, or opportunity form template. When you create a ticket, task, or opportunity from a form template that contains a checklist, checklist fields will be populated on the new ticket, task, or opportunity.
NOTE This is true even if a user who does not have permission to add a checklist is creating the ticket, task, or opportunity.
If the existing checklist already contains items, the form template checklist items will be appended to the bottom of the existing checklist, as long as the maximum number of 100 checklist items is not exceeded.
PERMISSIONS All users
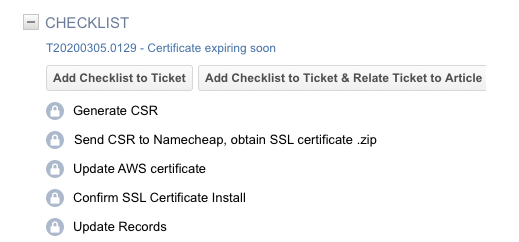
Knowledge base articles and documents may contain checklist templates that can be copied to a ticket. When you open the article or document from the ticket, you can copy the checklist to the ticket.
On the article or document, the checklist items are locked. They are unlocked when copied to the ticket.
- To copy the checklist to the ticket, click Add Checklist to Ticket.
- To additionally relate the source ticket to the document or article, click Add Checklist to Ticket & Relate Ticket to Article.
- If you open the article or document from a location other than a ticket, you can click either one of the buttons and enter a ticket number or use the ticket selector to search for the ticket.
The copied checklist will be added to any checklist items already on the ticket. If adding the checklist would put the ticket checklist over the 100 item limit, you will receive an error and will be prevented from copying the checklist.
NOTE If you update the checklist on the article or document, copied instances will not be updated.
What checklist items you can uncomplete and delete depends on your security permissions:
- All users can complete checklist items.
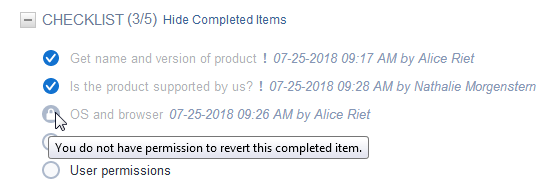
- Users without this permission can only uncomplete checklist items they completed themselves. In the screenshot below, you can see that Nathalie can only uncomplete items she completed herself. Items completed by Alice show a grayed-out button with a lock when it is hovered over.
- Users with Can delete/uncomplete items permission can uncomplete checklist items completed by anyone, and delete checklist items.
NOTE Deleting and completing/uncompleting checklist items counts as a "last activity" for the task or ticket.
If knowledge base articles or documents were associated with checklist item, you will see the title of the article or document following the checklist item name. To open the article or document, click the hyperlink.
PERMISSIONS Permission to Delete/Uncomplete checklist items
Users with permission to delete or uncomplete checklist items can delete individual items or can use the bulk menu to delete all, non-complete, or selected items.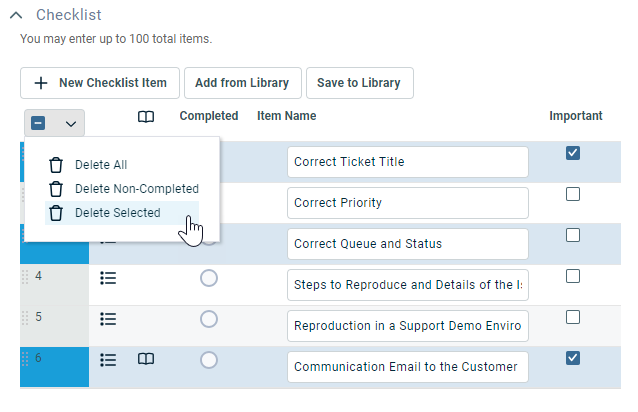
Do the following:
- On the entity page, click Edit.
- Navigate to the Checklist section.
- Right-click on a checklist item and select Delete.
- To delete multiple items, select them using Ctrl-click, and then select Delete Selected from the bulk menu. Or, select Delete All or Delete Non-Completed without row selection.
- The specified items are removed from the checklist.
NOTE You must save the ticket to permanently remove the deleted items. If you made a mistake, cancel the editing process.
PERMISSIONS Can add/edit Library Checklists permission
Refer to Add or edit a library checklist.
