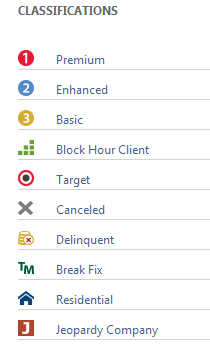
Classification icons
PERMISSIONS Security level with Admin permission to configure Organizations & Contacts. Refer to Organizations & Contacts.
NAVIGATION Left Navigation Menu > Admin > Admin Categories > Features & Settings > Organizations & Contacts > Classification Icons
About Classification icons
Classification icons are visual identifiers used to categorize and search for organizations. The icons appear with the organization name throughout Autotask.
EXAMPLE For example, if you sell different service plans, classification icons can identify which customers are on which plan. When an organization's name comes up on a ticket or in a list, you can quickly assess the type of service that organization receives.
You can also search and sort on the classification categories in both the organization search and CRM system dashboard.
If you are an Administrator with application wide access to features or with access to Organizations & Contacts, you can access the Classification Icons page. This page lists the default set of 10 system classification icons, along with any additional classification icons added by your company. You can also manage classification icons from this page:
- Add new classification icons
- Edit the name, description, and active status of any existing classification icon, including system classification icons
- Edit the images for classification icons your company has added, or delete the entire classification icon.
NOTE You cannot delete system classification icons, or edit their associated images.
- Drag and drop the rows in the list of classification icons to arrange their order, which controls the order in which the classifications appear in the selection menus for Classification fields throughout Autotask.
How to...
TIP You can have up to 200 classification icons, including the 10 system icons.
- To open the page, use the path(s) in the Security and navigation section above.
- On the Classification Icons page, click New.
- Complete the fields as described in the following table.
| Menu option | Description |
|---|---|
| Name | Required. This name will appear in selection menus when assigning or searching on a classification icon. Enter a name that describes what the classification icon represents. |
| Active | When selected (default), the classification icon is immediately available. If you do not want the icon to be available immediately, clear the check box. |
| Icon File | Required. Click Choose File to browse for, select, and upload the icon image file. Acceptable image types are PNG, JPEG, and GIF. The maximum width and height of the uploaded image file must 128 pixels or less. The image does not have to be square. If you attempt to upload an image that exceeds 128 x 128 pixels, your will see an error message. On upload, Autotask re-sizes the image so it is no taller or wider than 16 pixels. The original aspect ratio is maintained. For example, if the original image is 128 X 8 pixels, the icon image file is re-sized to 16 X 1 pixels. |
| Description | Enter a description of what the icon and classification represent. |
- Click Save & Close or Save & New.
Administrators with application wide access to features, or with access to Organizations & Contacts, can access the Classification Icons page. From this page, Administrators can edit, activate or inactivate, and customize the name and description of any classification icon.
For classification icons added by your company, Administrators can change the image file. They can also delete the classification icon. You cannot delete system classification icons, or change the image.
- On the Classification Icons page, hover over the context menu for the classification icon you want to edit.
- Select one of the options described in the following table.
| Menu option | Description |
|---|---|
| Edit | Select to open the Edit Classification Icon window and edit fields as needed. To change the icon image, click Change to display the Icon File - Choose File button. For a description of the Choose File button requirements and the other fields in this window, see Add a classification icon. NOTE You cannot change the image for system classification icons. |
| Active or Inactive (only one option appears in menu) | Select this option to change the Active state of the classification icon without opening the Edit Classification Icon page. |
| Delete | This option is only available for classification icons added by your company. Select to delete the classification icon. If the classification icon is associated with any organizations, a message opens to remind you that, if you delete the classification, those organizations will no longer be associated with any classification. |
The order of items in the Classification Icons page list determines the order in which the classification icons appear in selection menus in Autotask.
- Click and hold the number column on the far left of any row.
- Drag the row to the desired location and then release.


