Adding or editing notification templates
PERMISSIONS Security level with Admin permission to configure Email Notifications & Surveys. Refer to Admin security settings.
PERMISSIONS Security level with Admin permissions to configure Service Desk (Tickets), Organizations & Contacts, Sales & Opportunities, Contracts & Unposting, Projects & Tasks, or Client Portal & Taskfire, depending on the entity. Refer to Admin security settings.
NAVIGATION Left Navigation Menu > Admin > Admin Categories > Automation > Email Notifications & Surveys > Notification Templates > New
IMPORTANT Kaseya Support does not assist in creation, modification, or troubleshooting of custom HTML notification templates!
To add or edit a notification template, do the following:
- To open the page, use the path(s) in the Security and navigation section above. Click the tab corresponding to the type of template you'd like to create. For the tab corresponding to the event, refer to Events that can trigger notifications.
- Click New. The Notification Template window opens.
| Field | Description | |||||||||||||||||||||||||||||||||||||||||||||||||
|---|---|---|---|---|---|---|---|---|---|---|---|---|---|---|---|---|---|---|---|---|---|---|---|---|---|---|---|---|---|---|---|---|---|---|---|---|---|---|---|---|---|---|---|---|---|---|---|---|---|---|
General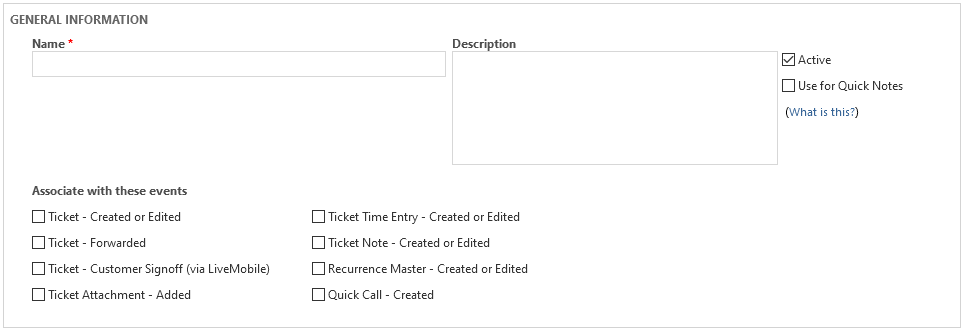 |
||||||||||||||||||||||||||||||||||||||||||||||||||
| Name | Enter a name for the template. | |||||||||||||||||||||||||||||||||||||||||||||||||
| Description | Enter a description. | |||||||||||||||||||||||||||||||||||||||||||||||||
| Active | Templates are Active by default, but you may clear this option. | |||||||||||||||||||||||||||||||||||||||||||||||||
| Use for Quick Notes | If you want this template to be the default template for all Quick Notes, select the check box. Refer to Selecting a default notification template for quick notes and quick time entries. | |||||||||||||||||||||||||||||||||||||||||||||||||
| Associate with these Events | Using the available check boxes, select the events for which you'd like to make this notification template available. The list of events will depend on the area tab you selected. Refer to Events that can trigger notifications. NOTE The tab on which a template is created will determine its availability for use with workflow rules. All templates created for a Service Desk entity will be available for all Service Desk events and workflow rules. NOTE If the notification template references a quote, it will pull values from the primary quote associated with the opportunity. |
|||||||||||||||||||||||||||||||||||||||||||||||||
Email Message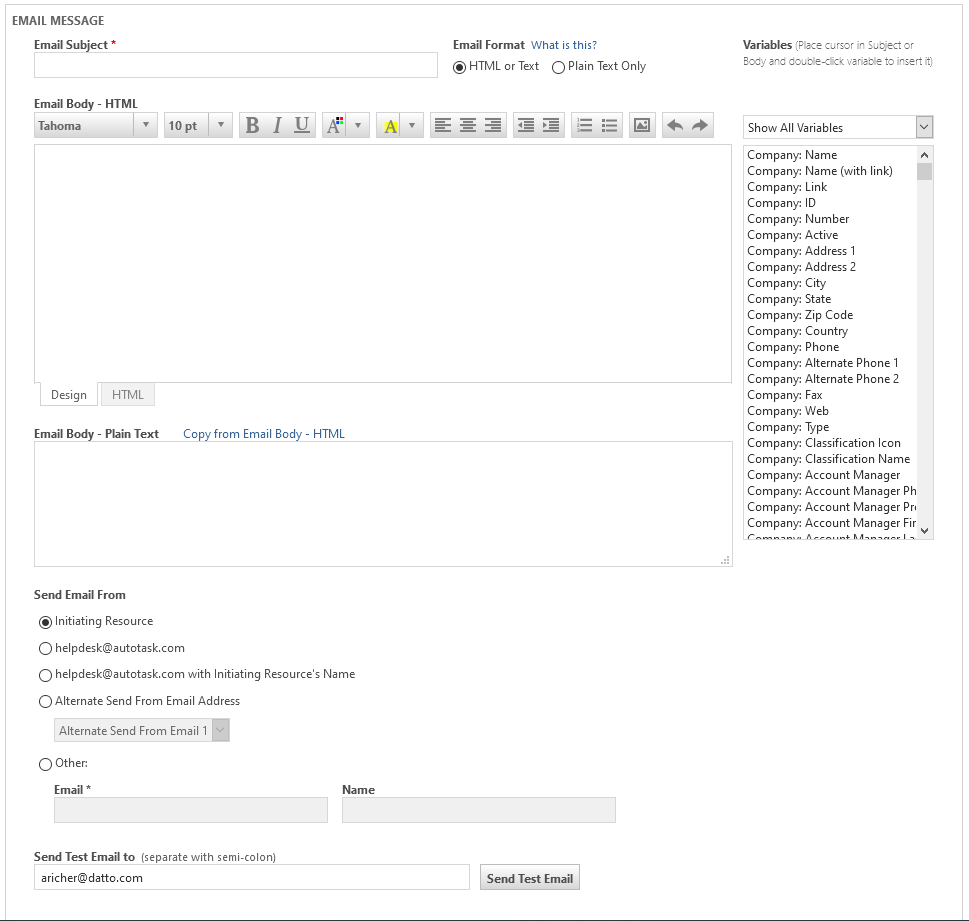 |
||||||||||||||||||||||||||||||||||||||||||||||||||
| Email Subject |
The text entered here will automatically populate the Subject Line field in the email but will remain editable. You may also use variables in the Subject Line. NOTE If you want emails related to a ticket to appear in conversation order in your email program, you must follow the rules explained in Displaying emails in conversation order. NOTE The character limit for the Subject Line is 500. If the content of a variable, for example, Ticket: Description, exceeds the character limit when used in the Subject Line, the Subject will truncate at 500 characters. |
|||||||||||||||||||||||||||||||||||||||||||||||||
| Email Format | The Email Format selection you make determines the type of notification you can create. If you select Plain Text Only, you'll be able to create a text notification, but formatting options will be limited. If you select HTML/Text, you can create HTML and text versions of the same notification. This option is recommended when you are sending notifications to recipients with mixed ability to display HTML. Refer to Email format options: HTML or plain text. | |||||||||||||||||||||||||||||||||||||||||||||||||
| Email Body |
Enter the body of your notification email. You can generate the text in your preferred software and copy and paste it into the Email Body panel. If you have selected the HTML Email Format, you may copy your email body into the Email Message (Plain Text) area using the Copy from Email Message (HTML) function. IMPORTANT Inline images in emails that were converted to tickets will remain inline. Images attached to converted emails will become available on the ticket's Activity tab. Links to external images will not be converted. |
|||||||||||||||||||||||||||||||||||||||||||||||||
| Variables |
To add variables to the template, place the cursor in Subject or Body and double-click the variable to insert it. Refer to Using variables in the HTML editor. If you include variables that use a Rich Text format, you must select the HTML or Text option under Email Format for the Rich Text formatting to be applied. If you select Plain Text Only, the plain text version of the variable will be used. NOTE You can send ticket note and ticket time entry notifications that include attachments to the notes or time entry by adding the following variables to the notification template: TIP To personalize the notification, add the Resource: Photo or the Miscellaneous: Initiating Resource Photo variable to your notification templates. |
|||||||||||||||||||||||||||||||||||||||||||||||||
| Send Email From |
This field determines the email address that is used as the Sender address in the notification email. Choose the email address you would like to use as the outgoing sender. Depending on the context, the following options are available: IMPORTANT Replies to notification emails will come to the selected email address. Make sure that the mailboxes are watched or the emails are properly redirected.
|
|||||||||||||||||||||||||||||||||||||||||||||||||
| Send Test Email to | Enter your email address and click Send Test Email to send a sample notification to your email address. | |||||||||||||||||||||||||||||||||||||||||||||||||
- Click Save & Close.


